Friday, February 28, 2014

Pillow Talk

Last week's addition of the new couch has officially kicked my living room re-do into high gear! Living in an apartment puts some limits on what I can do when it comes to redesign, so there will be no painting or moving of walls.  I can however, change the decor.  The couch alone has already given the start of my face lift some real brightness.  The boyfriend even have it his seal of approval last night, as we BOTH were able to sit comfortably while watching our inaugural movie together. (It was Indiana Jones in case you were wondering.) There are no real complaints as far as the couch goes, but I was slightly less than thrilled with the pillows that it came with.  Sure, they go well enough with the couch but they weren't really pulling together the colors that I wanted to go with.  So, of course, I decided I needed to (you guessed it) make my own pillow cases!

I knew that I wanted beige, aqua and grey to be my colors for this room and so I began looking at  a bunch of pillow ideas where I could incorporate those colors.  I found plenty of beautiful ideas, but none of them were really calling to me.  Finally, I remembered a bag I had pinned on Pinterest a while back. I absolutely loved the look of this bag and it suddenly hit me that I could incorporate the concept here into my very own color coordinated pillow covers! I gathered the fabrics that I wanted to use and set to work.

First, I took the main fabric and cut four 20 inch by 20 inch panels from it, (the measurements of the existing pillows) and set them aside.

 
Then, I took another section of my main fabric ironed an equal sized piece of fusible interfacing to the back of it to provide some stiffness to this piece.  The next step got into some of the more tedious work of this project.  Taking the interfaced section of my main fabric as well as a section of each of my accent fabrics, I traced circles onto the fabric.
 
 
I used a large spool of Gutermann's thread, but any smaller circular object will work.  Once all the tracing was done, I cut out all the circles (Whew! There were a LOT of circles!)
 
 
I then took two of my 20x20 panels and placed them on my cutting mat.  I drew a line across them, with pencil, at 7-1/2 inches from the top and from the bottom to make a middle section where my detail pieces would lay. 


Now, it was time to add my embellishments.  For each of the embellishments, I took one circle of the main color and one circle of my contrasting colors.  With wrong sides together, I lined up the two circles and folded in each side to form a cone shape.


Next I pinned each cone along bottom line of my allotted rectangle space.  I chose to alternate my cones between aqua and grey. 


Once an entire row was pinned in place, I sewed down each cone from the joining point of the folds up to the tip of the cone.
 
 
I continued adding layers, laying the next layer above the previous row, being sure to place them between the other cones so that the bottom partially covers the tips of the previous layers. (much like bricks or subway tiles) I continued this layering and sewing process row by row until I filled my designated space from the bottom up.  The tips of the last row sat just above my top pencil line. 
 
To give my pillow a nice, finished look, I took two 7-1/2 inch by 20 inch pieces and ironed down a quarter inch on the long edge of both pieces.  I pinned and sewed the first of these pieces along the upper pencil line right over the tops of the cones to hide them.


To keep the pillow looking even, I took my second 7-1/2 inch piece and ironed a 1/4 inch edge.  I folded back the very bottom layer of my cones so I could see my bottom pencil line. Then, I pinned and sewed that piece over my bottom pencil line.  The face of the pillow is now complete!
 
For the back of my pillow, I took another 20x20 square and cut it in half.


Then, I cut two 20x2inch strips from the extra fabric.  With right sides together, I sewed one of the 2 inch strips along the edge of one of my halves.
 
 
I ironed my seam flat and  then pinned the unfinished end of the 2 inch strip back and to the center of your seam.


Next, I sewed down the unfinished edge and then flipped it back over to the right side.  I sewed a top stitch along the folded edge to give it a nicer, more finished look.


I then pinned and sewed 5 pieces of Velcro onto the newly made edge piece. I then repeated those steps to complete the second half of my back panel.
 
 
Once my Velcro was sewn on, I pressed the Velcro pieces together to complete my back panel.  I lined up my front and back panels with right sides together, pinned them and sewed them together.
 
 
Once that was done, I undid the Velcro and flipped the entire pillow right side out.  I stuffed the old pillow inside and VOILA!!


I love the look of my new pillows and its only further motivating me to get the rest of my living room going.  I may even take the backing material from the old pillows and make some smaller accent pillows, who knows.  I have a rug on order that should be arriving this week as well.  I have an extra day off  of work and, per the news, a GINORMOUS storm is hitting So-Cal today.  Its raining pretty consistantly right now but we will see how big it really gets.  The news seems to be acting like we all need to be heading to Noah's ark right about now.  I enjoy the rain and will be spending my day indoors, watching chick flicks and getting some serious progress made on some brand new Etsy shop items! Stay dry and craft on everyone!

Friday, February 21, 2014

The great sofa adventure

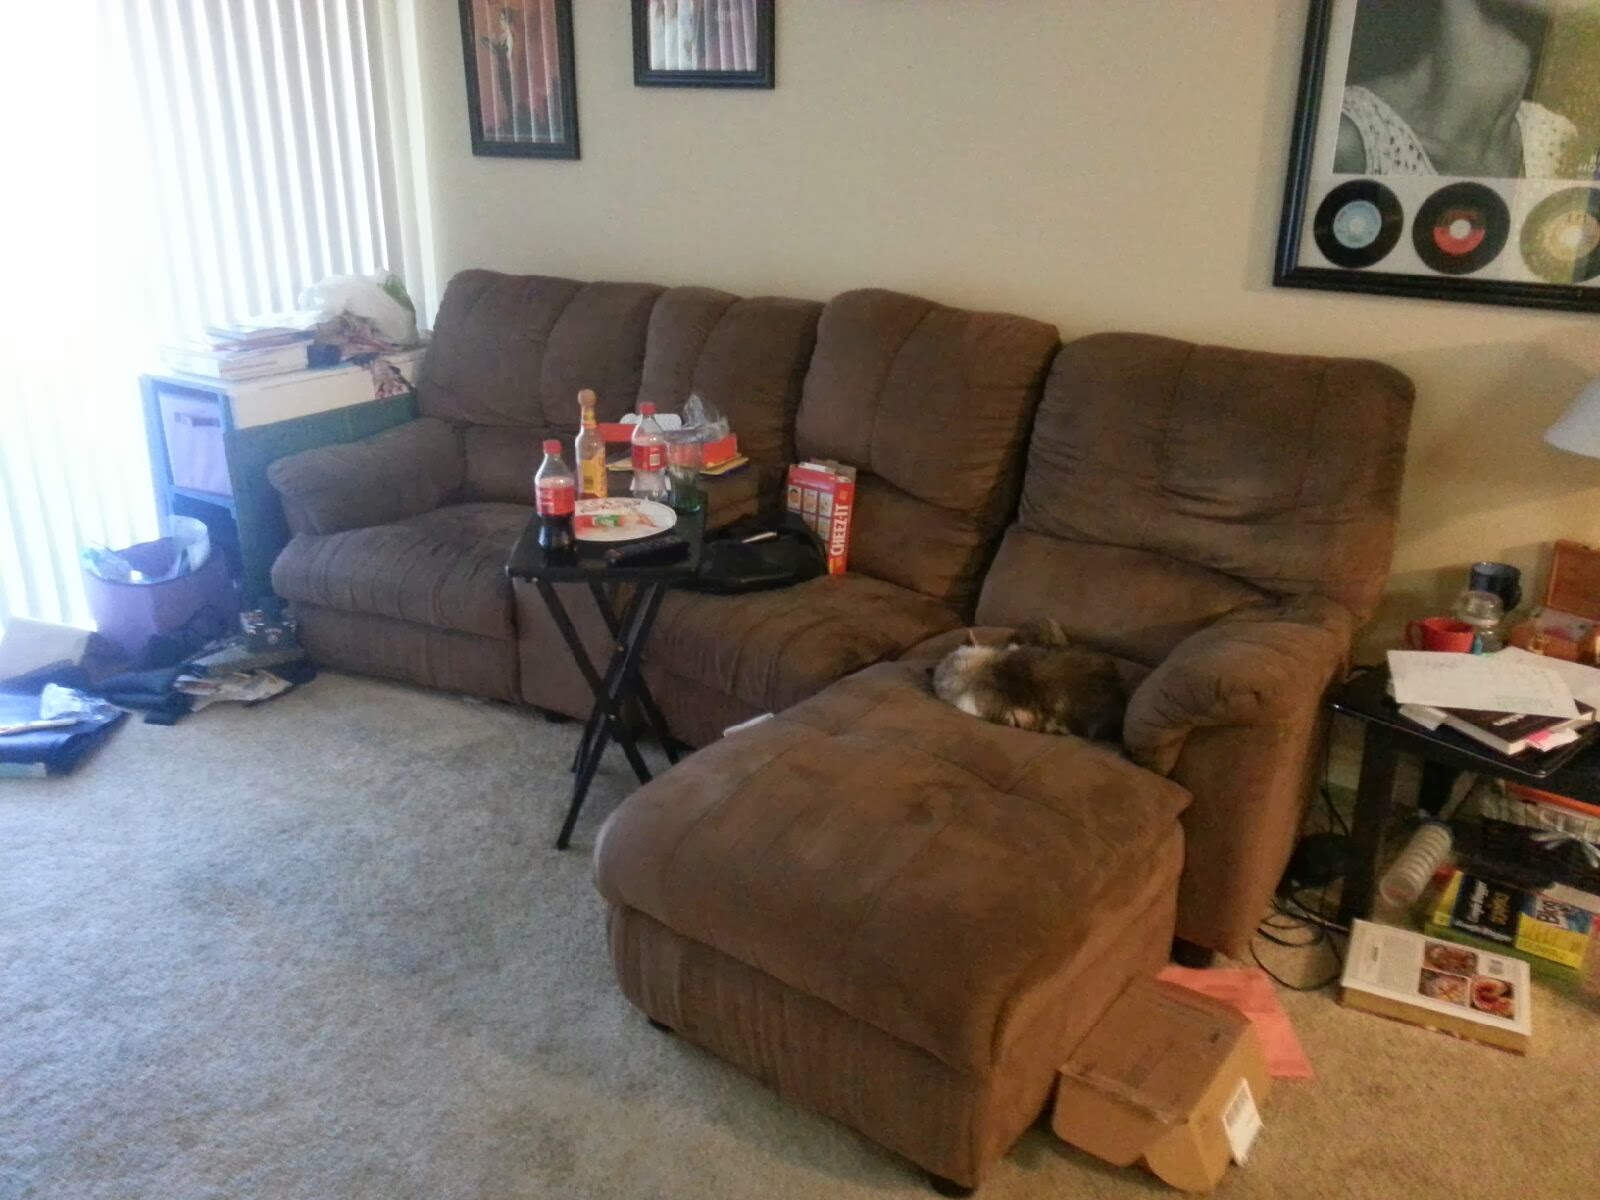
After another long week at work, I was anxious to start my weekend for one very exciting reason....I was FINALLY getting my brand new couch!  A number of months ago, I had decided that it was time to upgrade my couch. Though there was nothing really wrong with my current couch, I wanted something that was a little more "me".  My old couch was generously given to me by a former co-worker and friend when I first moved out on my own almost 7 years ago.  It has served me well in that time.  Now-a-days however, I have been really wanting a couch where my boyfriend and I can comfortably sit next to each other and watch a movie or one I can lay on while home sick and watch TV.  As you can see, though still good for sitting, my old couch was not entirely conducive to that....


(Please ignore my disaster! Too much time spent at work and getting stuff done for my  Etsy shop left me with little cleaning time when this was taken) As you can see, though my cat seems to have no problem with finding a comfortable spot, though my boyfriend and I CAN physically sit next to each other to watch a movie, its not exactly the most comfy for both of us.  And when I try to lay on it alone, I really am stuck laying in an "L" shape on the chaise portion.

My search for the perfect couch over the next several months, brought me to Living Spaces Furniture. I browsed their website and found a couch that looked like exactly what I wanted with a price tag to match.  However, I was not about to drop the money for a couch that I had not looked at and tested out in person first.  The closest store to me that had the model I wanted on display was a bit of a drive, but I happened to be heading out to visit my sister in Arizona and the store near her also had it on display. (yes, I am aware of the strangeness of driving to another state to check out a couch.) I figured that this way, I'm already out there and I would have the added bonus of a second pair of eyes and opinions.


Seeing the couch in person made me fall in love with it even more! The color was exactly what I wanted. It was so fresh and unique but not too bright or loud.


The fabric had a texture to it which looked like it would wear really well.  It was quiet comfy as well and I couldn't wait to purchase it and start adding decor items to my living room to match! Even my adorable niece enjoyed the sofa shopping and we found a chair that was just her size....


or maybe she would grow into it.....if she was a giant...

My boyfriend's sister offered to take my old couch off my hands since her dogs had done a number on her old couch.  I had finally saved up the money to buy my new couch (I really prefer to pay cash for most things) and had scheduled for it to be delivered late Tuesday afternoon. My boyfriend came by earlier in the day and we moved the pieces of my old sectional into his truck to take to his sister's place.  That is another wonderful feature of my old couch is that it comes apart into very manageable and pretty easily moved pieces.


With my couch now gone, I vacuumed up the floor and was somewhat impressed with myself that the carpet was not nearly as dirty as I thought it would be. Who's brilliant idea is it to put beige carpet ANYWHERE? Absolutely EVERYTHING makes it dirty! Water stains beige carpet, I swear!
 
The delivery people arrived shortly after I had cleaned up, and after about 5 minutes of them trying to get it in the door the tall way, my beautiful new couch was finally here!!
 
 
I absolutely love it! Its comfy and cute and has all the features that I wanted. I'm not crazy about the pillows that came with it and plan to make new covers. (Color suggestions anyone?) I have decided that I also need an area rug for this room to help add some detail and maybe draw in the colors from my posters.  Also, I did not have a coffee table before, as my couch was too big and made the room feel too crowded for a coffee table. I was thinking perhaps even one of those tufted ottoman/coffee tables.  I have seen some really great tutorials on pinterest and you know me, any excuse for another project!
 
As you can see, my living room (as with most of my life) is a work in progress.  I am so excited to be adding more of my touches and creating the space I want here.  My mind is just bubbling with all the possibilities and projects ahead of me for this room.
 
Later that evening, my boyfriend's sister text me this adorable picture of her dog enjoying her new lounging spot.  Clearly my old couch will continue to be well loved!


Friday, February 14, 2014

May the odds be ever in your favor

A month or two ago, my boyfriend's sister Tracy, invited me to join her and some friends for an archery lesson. Some of the regular attendees had dropped out last minute and they needed to fill the slots.  I was in the middle of a project that couldn't wait and as much as I desperately wanted to go, I had to pass.  I did tell her, however, to please let me know if she ever went again.  I always thought that archery would be a lot of fun, ever since my days in girls scouts when we got to try it at one of many activity stations at camp.  The Hunger Games only managed to fan the flames of my desire to learn archery.  I even looked into lessons at a nearby park at one point, but unfortunately they were only offered on Saturdays and I work.....sadness....

Imagine then, my insane level of excitement when a few weeks ago, she mentioned that were going again and asked if I would like to go. Um....YES!!! I anxiously counted down the days! Tuesday evening she picked me up and we headed down to Fullerton to meet the rest of the girls at the archery range.  I won't lie, I was tempted to braid my hair and throw on my leather jacket and boots....but I don't own a leather jacket....so I went in standard issue Janelle clothes instead. :(

Upon arrival of our group, the instructor sat us down for a short video that went over the basics of archery and taught us the safety rules for our shooting session.  Following the video, we were each given an arm guard (basically a thick piece of leather that is strapped to your forearm to protect it from the bowstring) and a leather finger guard. We were then fitted for our arrows and given a bow. (yes, who knew you needed to be fitted for arrows??) Then, we got to actually shoot!!


SO MUCH FUN!!! My first shot was actually in the center area of the target!


Not exactly a bulls eye or anything, but I was pretty impressed with myself. Of  course, I then totally jinxed myself (or as my boyfriend would say I started thinking too much LOL) and spent the next several rounds of shots shooting into the outer rings and off my target all together. HaHaHa. But check out this amazing shot!


Do you know how much skill it takes to put two arrows into the exact same spot?!? (yeah, yeah I'm aware they are completely off the target, but still....SKILL I tell ya!)

I was feeling kind of weird about halfway through our session as our instructor was going up and down the line giving everyone tips and adjusting their sights, but he never would say anything to me.  At first I thought "OK cool, apparently I know what I'm doing" swelling with pride at my apparent kindred spirit connection to Katniss Everdeen.  "Clearly, I was born to do this!" Then.....as we continued and I got more and more arrows missing my target altogether, and the instructor STILL would pass me by, my thoughts changed. I thought "Perhaps I am just so obviously terrible at this that he thinks its just a total waste of his time to even help me.....I am too far gone!"  However, I was still somehow having a blast, so I decided to carry on anyways.

In the past few years, shooting firearms at the range has been an activity that I thoroughly enjoy! There is something so much more primal and awesome feeling about shooting a bow and arrow. Don't get me wrong, it will never replace firearms shooting, but I REALLY enjoy shooting with a bow! When you let go of the bowstring and feel the power of the arrow flying towards your target (or in my case....directly outside of it) Its just frankly....awesome!

So, we gatherer our arrows for whats was to be our last round of shooting.  The instructor walked right behind me as I shot the first of my last three arrows.  I shot and again, I missed my target by a few inches.  I decided not to let the instructor off the hook so I turned to him and said "OK, what can I do to make this better?" He somewhat sheepishly looked at me and said "Well....I'm trying to figure out how to say this to you without sounding improper.....because you are a woman....well...." It was then that it came to me, that what I had suspected in the back of my head  was the problem, might indeed have been just that.....so I came to his rescue. "My boobs are too big?" I offered...LOL  The poor guy looked so relieved that he didn't have to say it out loud! "well...yeah.....they are getting in your way and you are pulling the string around them and its messing you up." He then proceeded to tell me a trick to fix the problem and changed my stance a bit and I tried again.

Clearly not yet used to my new stance, my next shot missed the target by quite a bit and went slamming into the wood post between the targets! The sound it made when it hit the post was pretty darn impressive though!  haha Tracy and I were quiet impressed with the sound. (Clearly accuracy took a back seat to "coolness") The instructor helped me adjust my sight and then I sent my very last arrow sailing through the air and it landed.....in the YELLOW!!! Yay!!

I felt quite good that I had at least bookended the session with some fairly good shots that certainly would have gotten my point across in a real battle. HaHa. Once I got my *cough cough* "obstacles quite literally out of my was (thank you Mom's side of the family for those genes) things seemed good.  I even ended up with a lovely "battle wound"!


My very last shot, the bowstring snapped just right and hit me just on the other side of the arm guard LOL go figure! I can't wait to go back again! I am seriously considering taking it up as a regular hobby. I had a total blast, despite the hick-ups and I am so glad I got to do it! Thanks again for the invite Tracy!


And May the odds be ever in your favor.

Monday, February 10, 2014

Step One-an organized pantry

We all know how it goes, work gets crazy and we find ourselves spending less time at home as we trudge on in the wonderful rat race of life. I don't know about you, but one of the first balls that gets dropped around my house when things get busy is food. (and laundry, but that's another story for another day LOL) There is food everywhere we go now-a-days and it becomes so simple to take care of other things and worry about food when I go on my lunch break. One less thing to worry about, right? Well, it may be easy, but its certainly not the healthiest solution to the problem.

My boyfriend text me earlier this week, presumably while consuming his own last minute lunch. We have both been wanting to eat healthier and he came up with an idea to get us both on the right track.  He suggested we both take turns cooking dinners that we can "exchange" with each other to bring to work. Since we, very often have opposite days off, this seemed like a great idea! I could prep meals on my days off for us and then, he could do the same for us on his days off. Or, whatever schedule we came up with. I got to work immediately!

I called my sister, a MASTER at home cooked meals, for any tips. (to be fair, I did call my Mom first, but she was busy helping my Dad with house projects so I got voicemail) Her biggest tip, she said, was to see what you have in your pantry FIRST and match what you have already and not have to buy or waste ingredients. Sounds simple enough right? Well.....then I opened my pantry and realized that there needed to be a different step one.......


I could not find my way around ANYTHING in this unorganized mess!! (enjoy my totally embarrassing pantry shot LOL)

To start with, I removed everything from the pantry.  I sorted it all and got rid of any and all expired products.  With a clear picture of what I had on hand, I picked out a few meals and made myself a shopping list.  I ran by Target first to grab some organizing supplies.


I  raided the dollar sport first and grabbed these handy little bins to keep small loose pantry items together like spice packets or jello boxes.  This way they could be in one place rather than floating around and getting lost in the back.

 
I grabbed a few magazine holder boxes for keeping my Ziploc bag boxes organized. (an idea I took from some pinterest posts)


I found these lovely stackable shelf units to better utilize my vertical space as well. Lastly, I picked up a few of these divided Ziploc containers for us to put our prepared meals in.


After a quick trip to the grocery store and a few hours of cooking, I had a fully organized and usable pantry and meals to get us through my work week. 


Not too bad for a days' work! It is just one out of the MANY projects that need tackling in my life, but its one step closer and the progress makes me happy!

Friday, February 28, 2014

Pillow Talk

Last week's addition of the new couch has officially kicked my living room re-do into high gear! Living in an apartment puts some limits on what I can do when it comes to redesign, so there will be no painting or moving of walls.  I can however, change the decor.  The couch alone has already given the start of my face lift some real brightness.  The boyfriend even have it his seal of approval last night, as we BOTH were able to sit comfortably while watching our inaugural movie together. (It was Indiana Jones in case you were wondering.) There are no real complaints as far as the couch goes, but I was slightly less than thrilled with the pillows that it came with.  Sure, they go well enough with the couch but they weren't really pulling together the colors that I wanted to go with.  So, of course, I decided I needed to (you guessed it) make my own pillow cases!

I knew that I wanted beige, aqua and grey to be my colors for this room and so I began looking at  a bunch of pillow ideas where I could incorporate those colors.  I found plenty of beautiful ideas, but none of them were really calling to me.  Finally, I remembered a bag I had pinned on Pinterest a while back. I absolutely loved the look of this bag and it suddenly hit me that I could incorporate the concept here into my very own color coordinated pillow covers! I gathered the fabrics that I wanted to use and set to work.

First, I took the main fabric and cut four 20 inch by 20 inch panels from it, (the measurements of the existing pillows) and set them aside.

 
Then, I took another section of my main fabric ironed an equal sized piece of fusible interfacing to the back of it to provide some stiffness to this piece.  The next step got into some of the more tedious work of this project.  Taking the interfaced section of my main fabric as well as a section of each of my accent fabrics, I traced circles onto the fabric.
 
 
I used a large spool of Gutermann's thread, but any smaller circular object will work.  Once all the tracing was done, I cut out all the circles (Whew! There were a LOT of circles!)
 
 
I then took two of my 20x20 panels and placed them on my cutting mat.  I drew a line across them, with pencil, at 7-1/2 inches from the top and from the bottom to make a middle section where my detail pieces would lay. 


Now, it was time to add my embellishments.  For each of the embellishments, I took one circle of the main color and one circle of my contrasting colors.  With wrong sides together, I lined up the two circles and folded in each side to form a cone shape.


Next I pinned each cone along bottom line of my allotted rectangle space.  I chose to alternate my cones between aqua and grey. 


Once an entire row was pinned in place, I sewed down each cone from the joining point of the folds up to the tip of the cone.
 
 
I continued adding layers, laying the next layer above the previous row, being sure to place them between the other cones so that the bottom partially covers the tips of the previous layers. (much like bricks or subway tiles) I continued this layering and sewing process row by row until I filled my designated space from the bottom up.  The tips of the last row sat just above my top pencil line. 
 
To give my pillow a nice, finished look, I took two 7-1/2 inch by 20 inch pieces and ironed down a quarter inch on the long edge of both pieces.  I pinned and sewed the first of these pieces along the upper pencil line right over the tops of the cones to hide them.


To keep the pillow looking even, I took my second 7-1/2 inch piece and ironed a 1/4 inch edge.  I folded back the very bottom layer of my cones so I could see my bottom pencil line. Then, I pinned and sewed that piece over my bottom pencil line.  The face of the pillow is now complete!
 
For the back of my pillow, I took another 20x20 square and cut it in half.


Then, I cut two 20x2inch strips from the extra fabric.  With right sides together, I sewed one of the 2 inch strips along the edge of one of my halves.
 
 
I ironed my seam flat and  then pinned the unfinished end of the 2 inch strip back and to the center of your seam.


Next, I sewed down the unfinished edge and then flipped it back over to the right side.  I sewed a top stitch along the folded edge to give it a nicer, more finished look.


I then pinned and sewed 5 pieces of Velcro onto the newly made edge piece. I then repeated those steps to complete the second half of my back panel.
 
 
Once my Velcro was sewn on, I pressed the Velcro pieces together to complete my back panel.  I lined up my front and back panels with right sides together, pinned them and sewed them together.
 
 
Once that was done, I undid the Velcro and flipped the entire pillow right side out.  I stuffed the old pillow inside and VOILA!!


I love the look of my new pillows and its only further motivating me to get the rest of my living room going.  I may even take the backing material from the old pillows and make some smaller accent pillows, who knows.  I have a rug on order that should be arriving this week as well.  I have an extra day off  of work and, per the news, a GINORMOUS storm is hitting So-Cal today.  Its raining pretty consistantly right now but we will see how big it really gets.  The news seems to be acting like we all need to be heading to Noah's ark right about now.  I enjoy the rain and will be spending my day indoors, watching chick flicks and getting some serious progress made on some brand new Etsy shop items! Stay dry and craft on everyone!

Friday, February 21, 2014

The great sofa adventure

After another long week at work, I was anxious to start my weekend for one very exciting reason....I was FINALLY getting my brand new couch!  A number of months ago, I had decided that it was time to upgrade my couch. Though there was nothing really wrong with my current couch, I wanted something that was a little more "me".  My old couch was generously given to me by a former co-worker and friend when I first moved out on my own almost 7 years ago.  It has served me well in that time.  Now-a-days however, I have been really wanting a couch where my boyfriend and I can comfortably sit next to each other and watch a movie or one I can lay on while home sick and watch TV.  As you can see, though still good for sitting, my old couch was not entirely conducive to that....


(Please ignore my disaster! Too much time spent at work and getting stuff done for my  Etsy shop left me with little cleaning time when this was taken) As you can see, though my cat seems to have no problem with finding a comfortable spot, though my boyfriend and I CAN physically sit next to each other to watch a movie, its not exactly the most comfy for both of us.  And when I try to lay on it alone, I really am stuck laying in an "L" shape on the chaise portion.

My search for the perfect couch over the next several months, brought me to Living Spaces Furniture. I browsed their website and found a couch that looked like exactly what I wanted with a price tag to match.  However, I was not about to drop the money for a couch that I had not looked at and tested out in person first.  The closest store to me that had the model I wanted on display was a bit of a drive, but I happened to be heading out to visit my sister in Arizona and the store near her also had it on display. (yes, I am aware of the strangeness of driving to another state to check out a couch.) I figured that this way, I'm already out there and I would have the added bonus of a second pair of eyes and opinions.


Seeing the couch in person made me fall in love with it even more! The color was exactly what I wanted. It was so fresh and unique but not too bright or loud.


The fabric had a texture to it which looked like it would wear really well.  It was quiet comfy as well and I couldn't wait to purchase it and start adding decor items to my living room to match! Even my adorable niece enjoyed the sofa shopping and we found a chair that was just her size....


or maybe she would grow into it.....if she was a giant...

My boyfriend's sister offered to take my old couch off my hands since her dogs had done a number on her old couch.  I had finally saved up the money to buy my new couch (I really prefer to pay cash for most things) and had scheduled for it to be delivered late Tuesday afternoon. My boyfriend came by earlier in the day and we moved the pieces of my old sectional into his truck to take to his sister's place.  That is another wonderful feature of my old couch is that it comes apart into very manageable and pretty easily moved pieces.


With my couch now gone, I vacuumed up the floor and was somewhat impressed with myself that the carpet was not nearly as dirty as I thought it would be. Who's brilliant idea is it to put beige carpet ANYWHERE? Absolutely EVERYTHING makes it dirty! Water stains beige carpet, I swear!
 
The delivery people arrived shortly after I had cleaned up, and after about 5 minutes of them trying to get it in the door the tall way, my beautiful new couch was finally here!!
 
 
I absolutely love it! Its comfy and cute and has all the features that I wanted. I'm not crazy about the pillows that came with it and plan to make new covers. (Color suggestions anyone?) I have decided that I also need an area rug for this room to help add some detail and maybe draw in the colors from my posters.  Also, I did not have a coffee table before, as my couch was too big and made the room feel too crowded for a coffee table. I was thinking perhaps even one of those tufted ottoman/coffee tables.  I have seen some really great tutorials on pinterest and you know me, any excuse for another project!
 
As you can see, my living room (as with most of my life) is a work in progress.  I am so excited to be adding more of my touches and creating the space I want here.  My mind is just bubbling with all the possibilities and projects ahead of me for this room.
 
Later that evening, my boyfriend's sister text me this adorable picture of her dog enjoying her new lounging spot.  Clearly my old couch will continue to be well loved!


Friday, February 14, 2014

May the odds be ever in your favor

A month or two ago, my boyfriend's sister Tracy, invited me to join her and some friends for an archery lesson. Some of the regular attendees had dropped out last minute and they needed to fill the slots.  I was in the middle of a project that couldn't wait and as much as I desperately wanted to go, I had to pass.  I did tell her, however, to please let me know if she ever went again.  I always thought that archery would be a lot of fun, ever since my days in girls scouts when we got to try it at one of many activity stations at camp.  The Hunger Games only managed to fan the flames of my desire to learn archery.  I even looked into lessons at a nearby park at one point, but unfortunately they were only offered on Saturdays and I work.....sadness....

Imagine then, my insane level of excitement when a few weeks ago, she mentioned that were going again and asked if I would like to go. Um....YES!!! I anxiously counted down the days! Tuesday evening she picked me up and we headed down to Fullerton to meet the rest of the girls at the archery range.  I won't lie, I was tempted to braid my hair and throw on my leather jacket and boots....but I don't own a leather jacket....so I went in standard issue Janelle clothes instead. :(

Upon arrival of our group, the instructor sat us down for a short video that went over the basics of archery and taught us the safety rules for our shooting session.  Following the video, we were each given an arm guard (basically a thick piece of leather that is strapped to your forearm to protect it from the bowstring) and a leather finger guard. We were then fitted for our arrows and given a bow. (yes, who knew you needed to be fitted for arrows??) Then, we got to actually shoot!!


SO MUCH FUN!!! My first shot was actually in the center area of the target!


Not exactly a bulls eye or anything, but I was pretty impressed with myself. Of  course, I then totally jinxed myself (or as my boyfriend would say I started thinking too much LOL) and spent the next several rounds of shots shooting into the outer rings and off my target all together. HaHaHa. But check out this amazing shot!


Do you know how much skill it takes to put two arrows into the exact same spot?!? (yeah, yeah I'm aware they are completely off the target, but still....SKILL I tell ya!)

I was feeling kind of weird about halfway through our session as our instructor was going up and down the line giving everyone tips and adjusting their sights, but he never would say anything to me.  At first I thought "OK cool, apparently I know what I'm doing" swelling with pride at my apparent kindred spirit connection to Katniss Everdeen.  "Clearly, I was born to do this!" Then.....as we continued and I got more and more arrows missing my target altogether, and the instructor STILL would pass me by, my thoughts changed. I thought "Perhaps I am just so obviously terrible at this that he thinks its just a total waste of his time to even help me.....I am too far gone!"  However, I was still somehow having a blast, so I decided to carry on anyways.

In the past few years, shooting firearms at the range has been an activity that I thoroughly enjoy! There is something so much more primal and awesome feeling about shooting a bow and arrow. Don't get me wrong, it will never replace firearms shooting, but I REALLY enjoy shooting with a bow! When you let go of the bowstring and feel the power of the arrow flying towards your target (or in my case....directly outside of it) Its just frankly....awesome!

So, we gatherer our arrows for whats was to be our last round of shooting.  The instructor walked right behind me as I shot the first of my last three arrows.  I shot and again, I missed my target by a few inches.  I decided not to let the instructor off the hook so I turned to him and said "OK, what can I do to make this better?" He somewhat sheepishly looked at me and said "Well....I'm trying to figure out how to say this to you without sounding improper.....because you are a woman....well...." It was then that it came to me, that what I had suspected in the back of my head  was the problem, might indeed have been just that.....so I came to his rescue. "My boobs are too big?" I offered...LOL  The poor guy looked so relieved that he didn't have to say it out loud! "well...yeah.....they are getting in your way and you are pulling the string around them and its messing you up." He then proceeded to tell me a trick to fix the problem and changed my stance a bit and I tried again.

Clearly not yet used to my new stance, my next shot missed the target by quite a bit and went slamming into the wood post between the targets! The sound it made when it hit the post was pretty darn impressive though!  haha Tracy and I were quiet impressed with the sound. (Clearly accuracy took a back seat to "coolness") The instructor helped me adjust my sight and then I sent my very last arrow sailing through the air and it landed.....in the YELLOW!!! Yay!!

I felt quite good that I had at least bookended the session with some fairly good shots that certainly would have gotten my point across in a real battle. HaHa. Once I got my *cough cough* "obstacles quite literally out of my was (thank you Mom's side of the family for those genes) things seemed good.  I even ended up with a lovely "battle wound"!


My very last shot, the bowstring snapped just right and hit me just on the other side of the arm guard LOL go figure! I can't wait to go back again! I am seriously considering taking it up as a regular hobby. I had a total blast, despite the hick-ups and I am so glad I got to do it! Thanks again for the invite Tracy!


And May the odds be ever in your favor.

Monday, February 10, 2014

Step One-an organized pantry

We all know how it goes, work gets crazy and we find ourselves spending less time at home as we trudge on in the wonderful rat race of life. I don't know about you, but one of the first balls that gets dropped around my house when things get busy is food. (and laundry, but that's another story for another day LOL) There is food everywhere we go now-a-days and it becomes so simple to take care of other things and worry about food when I go on my lunch break. One less thing to worry about, right? Well, it may be easy, but its certainly not the healthiest solution to the problem.

My boyfriend text me earlier this week, presumably while consuming his own last minute lunch. We have both been wanting to eat healthier and he came up with an idea to get us both on the right track.  He suggested we both take turns cooking dinners that we can "exchange" with each other to bring to work. Since we, very often have opposite days off, this seemed like a great idea! I could prep meals on my days off for us and then, he could do the same for us on his days off. Or, whatever schedule we came up with. I got to work immediately!

I called my sister, a MASTER at home cooked meals, for any tips. (to be fair, I did call my Mom first, but she was busy helping my Dad with house projects so I got voicemail) Her biggest tip, she said, was to see what you have in your pantry FIRST and match what you have already and not have to buy or waste ingredients. Sounds simple enough right? Well.....then I opened my pantry and realized that there needed to be a different step one.......


I could not find my way around ANYTHING in this unorganized mess!! (enjoy my totally embarrassing pantry shot LOL)

To start with, I removed everything from the pantry.  I sorted it all and got rid of any and all expired products.  With a clear picture of what I had on hand, I picked out a few meals and made myself a shopping list.  I ran by Target first to grab some organizing supplies.


I  raided the dollar sport first and grabbed these handy little bins to keep small loose pantry items together like spice packets or jello boxes.  This way they could be in one place rather than floating around and getting lost in the back.

 
I grabbed a few magazine holder boxes for keeping my Ziploc bag boxes organized. (an idea I took from some pinterest posts)


I found these lovely stackable shelf units to better utilize my vertical space as well. Lastly, I picked up a few of these divided Ziploc containers for us to put our prepared meals in.


After a quick trip to the grocery store and a few hours of cooking, I had a fully organized and usable pantry and meals to get us through my work week. 


Not too bad for a days' work! It is just one out of the MANY projects that need tackling in my life, but its one step closer and the progress makes me happy!