Showing posts with label Sewing. Show all posts

Monday, May 9, 2016

May the Fourth be with You 2016

This year, The Hubby and I hosted our first annual May the Fourth party! For those of you who don't know yet, I am a Star Wars nerd. The Hubby, he is a good sport. He has seen Star Wars and even let me drag him to opening day of The Force Awakens, but he is not anywhere close to the nerd that I, very proudly, am. I wanted to host our first Star Wars day party last year, but we were busy wedding planning and decided to host the first one this year instead, once things had calmed down a bit. So, I set out to make our first year party a success!

My very talented brother designed special invitations for me and I got them printed on Shutterfly. I used my new calligraphy skills and addressed all of the envelopes.


With the invites mailed off, I started planning the food and games. I tend to be a fan of more passive games versus something where we stop the flow of the party so everyone can watch while someone does something embarrassing. Blame my somewhat introverted nature, but none the less. I grabbed a couple of poster boards and set to work.

The first game was a Star Wars version of "Who said it?". I wrote quotes from characters throughout the series on yellow paper and mounted each onto the board.


With the second poster board a made a Star Wars version of "Guess who?" inspired by my sister. She plays a version of this at her annual Oscar party with outfits famous people wore. I printed out full length versions of various characters in their Star Wars costumes and redacted out the faces. Each character had a number and folks guessed who each costume belonged to.


Each guest grabbed a piece of paper, held down by my Han Solo in carbonite bottle opener, and a pen and set off to guessing.


For decorations, I tried to keep it simple. I found an awesome Etsy shop that sells Star Wars letter print outs, in an instant download, for $5! I printed out the letters I wanted, mounted them to purple card stock and hung them up between our patio cover supports.


I made a quick trip to my local party supply store and grabbed some silver lanterns, white and yellow curly ribbon hangers, white 3D crepe stars and silver cardboard stars and hung them all up.


For the food, I  printed out some freebie food labels and went for it! I decided to keep it pretty simple as well. I took pretzel sticks dipped in colored chocolate to make edible lightsabers.


The hubby cooked up some amazing "Han-burgers" and "Hutt Dogs"!


We had some "Force Fruit" and, my personal favorite, "7 Leia dip" (LOL!!!) along with "Trooper scoopers" for dipping. I was cracking up when I read the "7 Leia dip" one that I just HAD to serve that! Too funny!


The Hubby also helped me set up a bean bag toss game. I whipped up some bean bags with some Star Wars fabric scraps I had and he drilled my plastic bins onto a wood plank. Our guests had so much fun with this one!


We invited over all of the neighbors and their kiddos as well as a bunch of my fellow Star Wars loving friends. Everyone had a total blast! My Grandparents were the stars of the party in their home made Star Wars costumes, complete with lightsabers!


To finish off the day, I made Star Wars sugar cookies. I put them in vellum bags and sealed them with my official Rebel Alliance wax seal, and served them, of course, with Blue milk!


The party was such a blast that I didn't take many pictures during. I did of course wear my Han Solo dress from Halloween and didn't even take any pictures! Instead, I will share the picture of The Hubby and I from Halloween, since I was in the same outfit, and The Hubby will probably never be seen in this outfit again. So, for documentation purposes, here you have it! May the Fourth be with you!!


Friday, August 21, 2015

Disney Inspired

A few months back, a co-worker put in a special request for some bags for her Mom,sister and friend. She wanted bags for these girls to carry on the Disney cruise they will be going on in a couple of months.  She asked if I could design each of the three girls a tote bag inspired by their favorite Disney characters.  I LEAPED at the opportunity! Design bags that were both outside of my norm AND based on Disney inspiration??? I could not WAIT to get started!!

I started by getting the characters that she wanted: Ariel, Mary Poppins and Maleficent.  I began sketching out a few ideas to present to her. I wanted to keep the basic design of my bags the same and not add a ton of embellishment.  I wanted to keep all of the cotton panels and pockets in the same spots and let the colors and patterns speak for themselves and give the impressions of the characters.

After a couple rounds of drafts, I got an official OK and got to work.  I started with Ariel.  I had purchased some green scales fabric for a little mermaid costume I was going to make for a friend but never finished. (Sorry Jennie! I still have it all cut out if you ever still want me to make it!) I some more of the scales fabric, some purple, red and green cotton as well. I made the top strip of the bag out of the red fabric.  The pocket strip, I layered with the purple and the green scales.


This color scheme gave a pretty good Ariel vibe, but I felt like it needed just a little something extra.


I took a plain seashell and painted it with Martha Stewart multi-surface paint in Pearl finish-color "Purple Martin". If I haven't mentioned it before, I LOVE the Martha Stewart paints!! They have fantastic coverage and I have used them on a variety of surfaces and have been quite pleased with the results. I used E6000 industrial glue to attach 2 pins to the back of the seashell and pinned that onto the bag.  With that, the Ariel bag was complete!


Up next was the Mary Poppins bag! I was seriously excited about this one.  My friend wanted a bag inspired by Mary Poppins' white "Jolly Holiday" dress.  I grabbed a bunch of white eyelet lace, some red fabric and white and red satin ribbon.  The top panel was made using the white eyelet lace.  I added a ruffle to the center as well as a red bow.  For the pocket panel, I sewed strips of white ribbon to the red fabric equal distance away.  I then attached this strip of red to the center of the white pocket to mirror the corset portion of her dress.


When all put together, I think it turned out pretty awesome!!


Last, but certainly NOT the least challenging, was the Maleficent bag.  I'm definitely no stranger to Sleeping Beauty, but figuring out an inspirational design to portray this Disney villain took some thinking.  I googled some pictures of the animated version and up with a design that worked.  I found this cool marble looking black color along with some purple and neon green.  I purchased some purple satin ribbon and got to work.

I started out with the top strip.  I wanted this piece to echo Maleficent's headdress, since her outfit is relatively non-descript.  I sewed lines of purple satin ribbon onto the black fabric.


I didn't really notice, I mean I guess they were always there (its been a while since I have watched Sleeping Beauty) but Maleficent's headdress has purple stripes on it. Seriously, google it!

For the pocket portion, I layered the green, purple and black fabric in different sizes.  At this point, it was definitely giving me a Maleficent vibe, but I wanted it to have just a little something more.  I felt it needed a nod to Maleficent's magical staff to sort of pull it all together.  I took a wooden craft ball and painted in green using Martha Stewart paint in "Scottish Highlands". Then, I sponged on some swirly accents in "Citrine Gold". I used the industrial adhesive to attach pins to the back and pinned it to the bag and.....TAHDAH!!


I'm very happy with how they all turned out and had so much fun designing them! I plan to make more Disney inspired bags in my mini sized tote bag.  I'm pretty excited about the concept of my Disney inspired tote bag designs being carried around on a Disney cruise!! How cool is that???

Friday, February 6, 2015

Sewing room reveal

Its finally here! Between wedding planning, other home projects and life in general, I have finally managed to (mostly) complete the organization and layout of my sewing room!


There are still some minor things left to do, (we still need to put the doors back on the fabric hutch) but it is fully functional now and I can get back to sewing and coming up with new products for the shop.  So, without further ado, let me take you on a quick tour.

When you first walk in and turn to your right, there is a small bookshelf that holds my Tinker Bell nick knacks as well as some of my cook book and sewing books.


A few months back, I found these hanging wire baskets that I decided to hang here on the wall.  There is one for "magazines", "mail" and "stuff".


This is a quick way for me to keep important papers separate from my sewing stuff, and also an official place for The Fiance to put any mail that comes for me so it doesn't get lost.

Right next to that is my fabric hutch. (which The Fiance and I re-finished together)


Clearly, as I have said, the doors need to be put back on, and yes, I still need to finish the last 3 of my pattern storage boxes. All of this fabric has been calling my name for months and is just itching to made into something fantastic! I cannot wait to get started!

Next to the fabric hutch is my new Ikea shelving unit.  Its perfect for the TV/DVD player The Fiance gave me.  I like to have something on in the background while I sew.  Now, I am all set for watching FRIENDS or LOST or whatever other nerdy show I decide to re watch my way through. I liked this particular shelving unit because, rather than just a stand for the TV, it had shelves for extra storage, but still did not take up too much space.  I hit up an awesome sale at Michael's last week and got these super cute storage boxes. (currently holding wedding stuff)


Next up is my actual sewing table.  Its the same one from my old house.  Along with my beautiful sewing print hanging above.


I always think of FRIENDS when I look at it. (Any fellow FRIENDS nerds recognize this print? $5 discount coupon to my Etsy shop, for the first person to comment with the correct location where this print can be found on the show- GO!)

Next to that is my Ikea chair, or currently the storage place for my hand made star wars rag quilt and some freshly washed flannel that needs to be ironed. Any volunteers?


Right above that is a new addition to my sewing space.  A United States map! Stay tuned next week for further explanation.  Continuing on is my bookshelf. Pretty self explanatory I think.


Next to that is another new feature I added to my sewing space which I absolutely LOVE! My old "inspiration board" wasn't really working for the space I had.  On a trip to Michael's for some other crafting supplies, I was struck with an idea for a new, combo, inspiration/functional space. Michael's had 12x12 metal pegboards on sale.  I decided to combine these with 12x12 cork board squares, covered in fabric, to create an area that is decorative as well as useful. I just love how it turned out!


It also sits nicely above the fold out cutting table that was made for me by my good friend. Check out her creative adventures HERE.

The closet space is very much the same as my old closet space, with cubes for "project bins" to keep in progress projects from cluttering up my space. There is also plenty of space for my storage bins for keeping finished Etsy projects in prior to being sold. This is also where I keep more crafting supplies and scrapbooking items.


And of course, last but not least, no space of mine would be complete without this beauty inside the door.


The happy memories it brings of FRIENDS, both fictional and real, helps inspire me and my space as a place for fun a creativity. MY friends always inspire me to do my best and keep on creating! I love my new space and can't wait to get started on many new projects.


Monday, October 6, 2014

Sew it Seams meets Spoonflower

I am super excited to announce the latest addition to the Sew it Seams family! Sew it Seams is now officially on Spoonflower!  For those of you who are new to Spoonflower, or perhaps have never heard of it before, Spoonflower is a venue for creating your own fabrics, wallpapers and wrapping papers.  The company uses industrial sized fabric printers to then print your designs into whatever yardage you desire onto a multitude of fabric options.  They have everything from Kona cotton to faux suede and just about everything in between. This includes wrapping paper, both satin and matte finish, and wallpaper in two different types. I have known about Spoonflower for some time now, but it wasn't until a dear friend of mine recently had me order her some fabric from them that I really started taking an interest.

She had her eye on one of the mini tote bags from my shop to use as a new church bag. She sent me a link to the fabric she wanted and I was so impressed with the design of a fabric so unique and specific to her religion.  It was just so cute!  I was even more impressed with the quality of both the image and the fabric once it arrived.

 
I got to work right away and her bag turned out so good!  And, when i delivered it, she loved it!


When I saw how cool and unique the fabric was, I started doing a little more browsing around and was blown away by the amazing volume of cool and unique fabrics that were available on their site.  I got SUPER excited when I discovered their weekly design contest! Every week, Spoonflower has a theme and you can enter a design that goes along with the theme. Spoonflower account holders get to vote for their favorite designs and the winning designs get featured on their web page and blog. How cool right?

So, of course, I got to work!  I am no great artist of realism, so I decided to try my hand at some whimsical fabric designs. I jotted down the next three weeks of contest themes and started brainstorming.  I started with this week's current theme "Ballet".   I decided to draw myself a rough ballet slipper element. I drew it with pencil and then colored it in with markers.

 
I scanned the image into my computer, then uploaded it onto the Spoonflower site and used their editing software to turn my simple design into a (well, what I think is pretty adorable) fabric design.
 

I uploaded this design officially to the contest which opened earlier this week. If you get a chance, take a quick minute to start up your own Spoonflower account and vote for your favorite designs! They may have just been flattering me, but when I logged into my account to vote, they had my design as one of the random samples featured.  That was kinda neat!


This design has already been favorited by a few people and its just so exciting! Favorites are different than votes in the contest, which I don't get to see totals of until the contest ends. I got a special email from Spoonflower also this week telling me that my design was featured on their "Recent trends" shopping page. (excuse my ridiculous screen shot pictures, I was excited!)


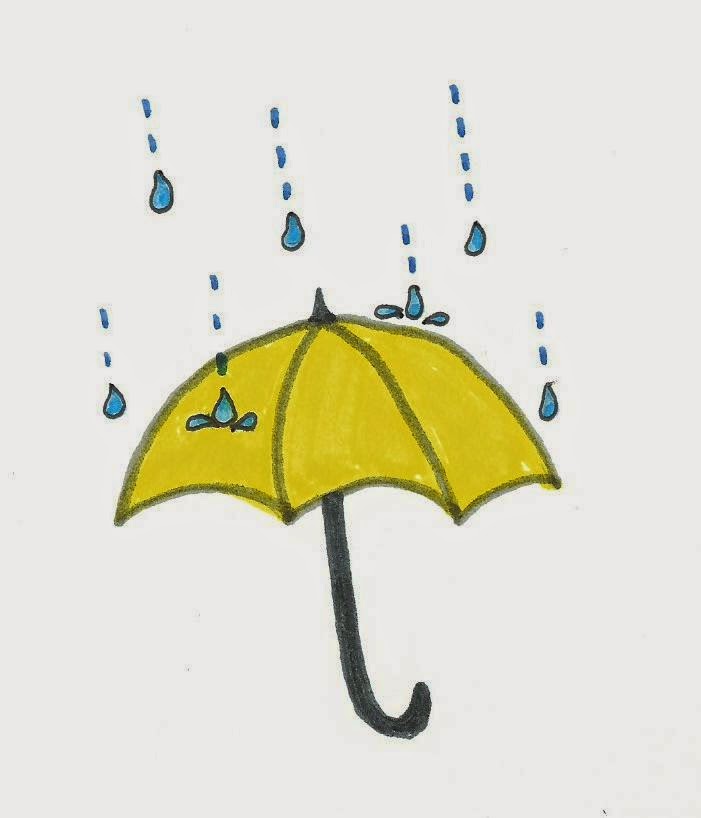
I have already finished the next two weeks of designs and am getting started on the next two weeks after that. I am really having so much fun with this!  Here is my fabric design for next week's "Umbrella" contest.


And my submission for the "Clocks and Timepieces" contest the following week.


 To add to the fun, all of my designs so far are available for purchase. Which means....You can order any of my bags as a custom order in a fabric designed special by me!  OR you can order my fabrics for your very own sewing projects. This week, I received sample swatches of my fabrics. It was so exciting seeing something that I designed printed on real fabric!


As a Spoonflower designer, I do earn "Spoondollars" as a commission of sorts for any purchases of my designs. Even if you don't have a need for fabric,wallpaper or wrapping paper, I hope that you will help support Sew it Seams latest adventure and vote for my designs (as well as any of the other very deserving designs) in the weekly contests. Voting ends Wednesday (so still plenty of time to get those votes in this week!) and the new contests start Thursdays. Spoonflower also has a weekly contest on their blog, which is usually for some really cool crafty or sewing books and often times free yardage of fabric or wrapping paper. Its also super quick and easy to enter, just need an email address. I am super excited for this new adventure! I have also created a new link to my Spoonflower shop on the right hand side of the blog for quick access to my shop. Thank you all for everything you do! Keep on crafting!


Showing posts with label Sewing. Show all posts

Monday, May 9, 2016

May the Fourth be with You 2016

This year, The Hubby and I hosted our first annual May the Fourth party! For those of you who don't know yet, I am a Star Wars nerd. The Hubby, he is a good sport. He has seen Star Wars and even let me drag him to opening day of The Force Awakens, but he is not anywhere close to the nerd that I, very proudly, am. I wanted to host our first Star Wars day party last year, but we were busy wedding planning and decided to host the first one this year instead, once things had calmed down a bit. So, I set out to make our first year party a success!

My very talented brother designed special invitations for me and I got them printed on Shutterfly. I used my new calligraphy skills and addressed all of the envelopes.


With the invites mailed off, I started planning the food and games. I tend to be a fan of more passive games versus something where we stop the flow of the party so everyone can watch while someone does something embarrassing. Blame my somewhat introverted nature, but none the less. I grabbed a couple of poster boards and set to work.

The first game was a Star Wars version of "Who said it?". I wrote quotes from characters throughout the series on yellow paper and mounted each onto the board.


With the second poster board a made a Star Wars version of "Guess who?" inspired by my sister. She plays a version of this at her annual Oscar party with outfits famous people wore. I printed out full length versions of various characters in their Star Wars costumes and redacted out the faces. Each character had a number and folks guessed who each costume belonged to.


Each guest grabbed a piece of paper, held down by my Han Solo in carbonite bottle opener, and a pen and set off to guessing.


For decorations, I tried to keep it simple. I found an awesome Etsy shop that sells Star Wars letter print outs, in an instant download, for $5! I printed out the letters I wanted, mounted them to purple card stock and hung them up between our patio cover supports.


I made a quick trip to my local party supply store and grabbed some silver lanterns, white and yellow curly ribbon hangers, white 3D crepe stars and silver cardboard stars and hung them all up.


For the food, I  printed out some freebie food labels and went for it! I decided to keep it pretty simple as well. I took pretzel sticks dipped in colored chocolate to make edible lightsabers.


The hubby cooked up some amazing "Han-burgers" and "Hutt Dogs"!


We had some "Force Fruit" and, my personal favorite, "7 Leia dip" (LOL!!!) along with "Trooper scoopers" for dipping. I was cracking up when I read the "7 Leia dip" one that I just HAD to serve that! Too funny!


The Hubby also helped me set up a bean bag toss game. I whipped up some bean bags with some Star Wars fabric scraps I had and he drilled my plastic bins onto a wood plank. Our guests had so much fun with this one!


We invited over all of the neighbors and their kiddos as well as a bunch of my fellow Star Wars loving friends. Everyone had a total blast! My Grandparents were the stars of the party in their home made Star Wars costumes, complete with lightsabers!


To finish off the day, I made Star Wars sugar cookies. I put them in vellum bags and sealed them with my official Rebel Alliance wax seal, and served them, of course, with Blue milk!


The party was such a blast that I didn't take many pictures during. I did of course wear my Han Solo dress from Halloween and didn't even take any pictures! Instead, I will share the picture of The Hubby and I from Halloween, since I was in the same outfit, and The Hubby will probably never be seen in this outfit again. So, for documentation purposes, here you have it! May the Fourth be with you!!


Friday, August 21, 2015

Disney Inspired

A few months back, a co-worker put in a special request for some bags for her Mom,sister and friend. She wanted bags for these girls to carry on the Disney cruise they will be going on in a couple of months.  She asked if I could design each of the three girls a tote bag inspired by their favorite Disney characters.  I LEAPED at the opportunity! Design bags that were both outside of my norm AND based on Disney inspiration??? I could not WAIT to get started!!

I started by getting the characters that she wanted: Ariel, Mary Poppins and Maleficent.  I began sketching out a few ideas to present to her. I wanted to keep the basic design of my bags the same and not add a ton of embellishment.  I wanted to keep all of the cotton panels and pockets in the same spots and let the colors and patterns speak for themselves and give the impressions of the characters.

After a couple rounds of drafts, I got an official OK and got to work.  I started with Ariel.  I had purchased some green scales fabric for a little mermaid costume I was going to make for a friend but never finished. (Sorry Jennie! I still have it all cut out if you ever still want me to make it!) I some more of the scales fabric, some purple, red and green cotton as well. I made the top strip of the bag out of the red fabric.  The pocket strip, I layered with the purple and the green scales.


This color scheme gave a pretty good Ariel vibe, but I felt like it needed just a little something extra.


I took a plain seashell and painted it with Martha Stewart multi-surface paint in Pearl finish-color "Purple Martin". If I haven't mentioned it before, I LOVE the Martha Stewart paints!! They have fantastic coverage and I have used them on a variety of surfaces and have been quite pleased with the results. I used E6000 industrial glue to attach 2 pins to the back of the seashell and pinned that onto the bag.  With that, the Ariel bag was complete!


Up next was the Mary Poppins bag! I was seriously excited about this one.  My friend wanted a bag inspired by Mary Poppins' white "Jolly Holiday" dress.  I grabbed a bunch of white eyelet lace, some red fabric and white and red satin ribbon.  The top panel was made using the white eyelet lace.  I added a ruffle to the center as well as a red bow.  For the pocket panel, I sewed strips of white ribbon to the red fabric equal distance away.  I then attached this strip of red to the center of the white pocket to mirror the corset portion of her dress.


When all put together, I think it turned out pretty awesome!!


Last, but certainly NOT the least challenging, was the Maleficent bag.  I'm definitely no stranger to Sleeping Beauty, but figuring out an inspirational design to portray this Disney villain took some thinking.  I googled some pictures of the animated version and up with a design that worked.  I found this cool marble looking black color along with some purple and neon green.  I purchased some purple satin ribbon and got to work.

I started out with the top strip.  I wanted this piece to echo Maleficent's headdress, since her outfit is relatively non-descript.  I sewed lines of purple satin ribbon onto the black fabric.


I didn't really notice, I mean I guess they were always there (its been a while since I have watched Sleeping Beauty) but Maleficent's headdress has purple stripes on it. Seriously, google it!

For the pocket portion, I layered the green, purple and black fabric in different sizes.  At this point, it was definitely giving me a Maleficent vibe, but I wanted it to have just a little something more.  I felt it needed a nod to Maleficent's magical staff to sort of pull it all together.  I took a wooden craft ball and painted in green using Martha Stewart paint in "Scottish Highlands". Then, I sponged on some swirly accents in "Citrine Gold". I used the industrial adhesive to attach pins to the back and pinned it to the bag and.....TAHDAH!!


I'm very happy with how they all turned out and had so much fun designing them! I plan to make more Disney inspired bags in my mini sized tote bag.  I'm pretty excited about the concept of my Disney inspired tote bag designs being carried around on a Disney cruise!! How cool is that???

Friday, February 6, 2015

Sewing room reveal

Its finally here! Between wedding planning, other home projects and life in general, I have finally managed to (mostly) complete the organization and layout of my sewing room!


There are still some minor things left to do, (we still need to put the doors back on the fabric hutch) but it is fully functional now and I can get back to sewing and coming up with new products for the shop.  So, without further ado, let me take you on a quick tour.

When you first walk in and turn to your right, there is a small bookshelf that holds my Tinker Bell nick knacks as well as some of my cook book and sewing books.


A few months back, I found these hanging wire baskets that I decided to hang here on the wall.  There is one for "magazines", "mail" and "stuff".


This is a quick way for me to keep important papers separate from my sewing stuff, and also an official place for The Fiance to put any mail that comes for me so it doesn't get lost.

Right next to that is my fabric hutch. (which The Fiance and I re-finished together)


Clearly, as I have said, the doors need to be put back on, and yes, I still need to finish the last 3 of my pattern storage boxes. All of this fabric has been calling my name for months and is just itching to made into something fantastic! I cannot wait to get started!

Next to the fabric hutch is my new Ikea shelving unit.  Its perfect for the TV/DVD player The Fiance gave me.  I like to have something on in the background while I sew.  Now, I am all set for watching FRIENDS or LOST or whatever other nerdy show I decide to re watch my way through. I liked this particular shelving unit because, rather than just a stand for the TV, it had shelves for extra storage, but still did not take up too much space.  I hit up an awesome sale at Michael's last week and got these super cute storage boxes. (currently holding wedding stuff)


Next up is my actual sewing table.  Its the same one from my old house.  Along with my beautiful sewing print hanging above.


I always think of FRIENDS when I look at it. (Any fellow FRIENDS nerds recognize this print? $5 discount coupon to my Etsy shop, for the first person to comment with the correct location where this print can be found on the show- GO!)

Next to that is my Ikea chair, or currently the storage place for my hand made star wars rag quilt and some freshly washed flannel that needs to be ironed. Any volunteers?


Right above that is a new addition to my sewing space.  A United States map! Stay tuned next week for further explanation.  Continuing on is my bookshelf. Pretty self explanatory I think.


Next to that is another new feature I added to my sewing space which I absolutely LOVE! My old "inspiration board" wasn't really working for the space I had.  On a trip to Michael's for some other crafting supplies, I was struck with an idea for a new, combo, inspiration/functional space. Michael's had 12x12 metal pegboards on sale.  I decided to combine these with 12x12 cork board squares, covered in fabric, to create an area that is decorative as well as useful. I just love how it turned out!


It also sits nicely above the fold out cutting table that was made for me by my good friend. Check out her creative adventures HERE.

The closet space is very much the same as my old closet space, with cubes for "project bins" to keep in progress projects from cluttering up my space. There is also plenty of space for my storage bins for keeping finished Etsy projects in prior to being sold. This is also where I keep more crafting supplies and scrapbooking items.


And of course, last but not least, no space of mine would be complete without this beauty inside the door.


The happy memories it brings of FRIENDS, both fictional and real, helps inspire me and my space as a place for fun a creativity. MY friends always inspire me to do my best and keep on creating! I love my new space and can't wait to get started on many new projects.


Monday, October 6, 2014

Sew it Seams meets Spoonflower

I am super excited to announce the latest addition to the Sew it Seams family! Sew it Seams is now officially on Spoonflower!  For those of you who are new to Spoonflower, or perhaps have never heard of it before, Spoonflower is a venue for creating your own fabrics, wallpapers and wrapping papers.  The company uses industrial sized fabric printers to then print your designs into whatever yardage you desire onto a multitude of fabric options.  They have everything from Kona cotton to faux suede and just about everything in between. This includes wrapping paper, both satin and matte finish, and wallpaper in two different types. I have known about Spoonflower for some time now, but it wasn't until a dear friend of mine recently had me order her some fabric from them that I really started taking an interest.

She had her eye on one of the mini tote bags from my shop to use as a new church bag. She sent me a link to the fabric she wanted and I was so impressed with the design of a fabric so unique and specific to her religion.  It was just so cute!  I was even more impressed with the quality of both the image and the fabric once it arrived.

 
I got to work right away and her bag turned out so good!  And, when i delivered it, she loved it!


When I saw how cool and unique the fabric was, I started doing a little more browsing around and was blown away by the amazing volume of cool and unique fabrics that were available on their site.  I got SUPER excited when I discovered their weekly design contest! Every week, Spoonflower has a theme and you can enter a design that goes along with the theme. Spoonflower account holders get to vote for their favorite designs and the winning designs get featured on their web page and blog. How cool right?

So, of course, I got to work!  I am no great artist of realism, so I decided to try my hand at some whimsical fabric designs. I jotted down the next three weeks of contest themes and started brainstorming.  I started with this week's current theme "Ballet".   I decided to draw myself a rough ballet slipper element. I drew it with pencil and then colored it in with markers.

 
I scanned the image into my computer, then uploaded it onto the Spoonflower site and used their editing software to turn my simple design into a (well, what I think is pretty adorable) fabric design.
 

I uploaded this design officially to the contest which opened earlier this week. If you get a chance, take a quick minute to start up your own Spoonflower account and vote for your favorite designs! They may have just been flattering me, but when I logged into my account to vote, they had my design as one of the random samples featured.  That was kinda neat!


This design has already been favorited by a few people and its just so exciting! Favorites are different than votes in the contest, which I don't get to see totals of until the contest ends. I got a special email from Spoonflower also this week telling me that my design was featured on their "Recent trends" shopping page. (excuse my ridiculous screen shot pictures, I was excited!)


I have already finished the next two weeks of designs and am getting started on the next two weeks after that. I am really having so much fun with this!  Here is my fabric design for next week's "Umbrella" contest.


And my submission for the "Clocks and Timepieces" contest the following week.


 To add to the fun, all of my designs so far are available for purchase. Which means....You can order any of my bags as a custom order in a fabric designed special by me!  OR you can order my fabrics for your very own sewing projects. This week, I received sample swatches of my fabrics. It was so exciting seeing something that I designed printed on real fabric!


As a Spoonflower designer, I do earn "Spoondollars" as a commission of sorts for any purchases of my designs. Even if you don't have a need for fabric,wallpaper or wrapping paper, I hope that you will help support Sew it Seams latest adventure and vote for my designs (as well as any of the other very deserving designs) in the weekly contests. Voting ends Wednesday (so still plenty of time to get those votes in this week!) and the new contests start Thursdays. Spoonflower also has a weekly contest on their blog, which is usually for some really cool crafty or sewing books and often times free yardage of fabric or wrapping paper. Its also super quick and easy to enter, just need an email address. I am super excited for this new adventure! I have also created a new link to my Spoonflower shop on the right hand side of the blog for quick access to my shop. Thank you all for everything you do! Keep on crafting!