Monday, March 9, 2015

And the Oscar goes to....

Several years ago, my sister and her husband started holding annual Oscar parties.  We were a family of theatre kids and always watched the Oscars growing up. At least as often as we could convince my parents to let us stay up late to do so.  We hardly ever saw any of the movies nominated, but we would watch it!  Since this is the first year The Fiance and I have our own place, I decided (rather last minute) to throw our very first Oscar party!


The Fiance, who is well aware of just how big of a nerd I am, was sort of laughing at me and asking what happens at an Oscar party?  He, apparently, has NEVER watched The Oscars!?! Since my sister is the resident expert, I called her for some tips. She sent me a link for this years winner's ballot as well as a super cool Oscar Bingo!


For those who are generally not interested in The Oscars, might I just say, its a a LOT more fun when you are playing Bingo and get to block out a space when a celebrity trips or cries!

I provided dinner for my guests and asked them each to bring their favorite movie snack to share. I decided to make "popcorn cupcakes" to share! I made a batch of vanilla cupcakes and let them cool.  I found a template for popcorn cupcake wrappers and printed and cut them out.


I taped one wrapper around each cooled cupcake and lightly frosted the top of each one using vanilla frosting.  I then took mini marshmallows and cut each one in half.  Then squished the two halves together to form abnormal-popcorn shapes. Once I had enough, I covered the tops of the cupcakes with the "popcorn-marshmallows".  And of course, no popcorn is complete with out the butter!! I put 2 drops of yellow food coloring into a bowl and mixed it with a spoon full of water.  With a clean q-tip, I dabbed the "butter" onto the marshmallows and.....tah dah!!!  POPCORN CUPCAKES!


I printed out enough official ballots and bingo boards for my guests.  I ordered official bingo daubers from Amazon in a plethora of colors.  I found a template for little Oscar statues to use for decorations.


I traced several onto black and gold paper , assembled them and placed them around the room. Now, it was feeling very "Oscar-ey"!!


For the final touch, I prepped prizes for the winners.  My sister advised that it was best to have a first and second prize winner for bingo to keep the game going throughout the awards ceremony.  For fist prize, I hit up my local 99cent store and assembled a "movie night" basket, complete with popcorn, sodas, candy and a Redbox movie code.


For second prize, I printed  out an "Oscar winner" card and put two Redbox code on the back. (The Fiance won second place, by the way. I guess Oscar Bingo isn't too nerdy for him after all haha.)

For the Oscar winner ballots, I had each of my guests place their votes for the winners before the ceremony started and we graded them as we went.  My sister has an "Oscar statue" that she made out of an old Nutcracker that she found at a thrift store and spray painted gold.  Every year, the previous years winner brings back the trophy and it goes home with that year's winner, Stanley Cup style.  I decided we needed our own trophy.  I was running behind and did not have time to search for a nutcracker of my own, so I improvised! I had a round plastic box that I decided to use for the base.


I filled it partly with some hot glue for added weight and stability. Then, I sealed the lid on.


In my search for an Oscar look alike, I came across a box of PEZ dispensers at the impulse-buy section at JoAnn. Who better than Kermit the Frog to emulate the infamous Oscar??


I secure him to the circular base and gave the entire statue a coating of gold spray paint. How cute is this??


My best friend's husband won the ballot contest by a landslide! Here is his awesomely theatrical award acceptance photo shoot!


Everyone had a great time! Especially the debate over whether or not a diet coke commercial counted as a "coke commercial" for the bingo game! Seriously, HUGE and lengthy debate!! LOL I am looking forward to carrying on the tradition and seeing who gets to take "Kerm-Oscar" home next year!

Monday, February 16, 2015

Get in the groove

DISCLAIMER: This is not a sponsored post and all opinions expressed are 100% my own.

I would like to cordially invite you all to get in the groove: Groove book that is! Once in a while, a product comes along that is just too awesome NOT to share! A friend of mine recently told me about the photo app Groove book. For any of you who have not heard of it, it was recently featured on the TV show Shark Tank and was also just purchased by Shutterfly. Basically, its a subscription service and fantastic way to print out copies of your photos. The app itself is free to download for IPhone as well as Android phones.  For $2.99 a month, (plus tax: equals out to a little over $3-shipping included) you upload 100 pictures (or 40 pictures with multiple copies of each, adding up to 100) and they send you printed copies of your pictures in a bound 4x6 booklet! Each photo is perforated at the edge so that you can tear them out, or leave them in the adorable little booklet for sharing. 

I was skeptical at first when a friend of mine told me about this app. $3 for 100 printed pictures?? How good is the quality of the prints, I wondered. So, I started reading around on some reviews. Several people commented that the quality of the images was poor. Others, could not stop raving about how awesome this service was. So, I decided to go for it! You can cancel your subscription any time. So, I figured that for three bucks, I could chance it and see how it goes. I downloaded the app and started uploading pictures right away. I placed my first order the very next day. My very first Groovebook arrived just the other day. First of all, how stinking cute is this??


I was already impressed by its adorable-ness! I opened it up and continued to be blown away! The pictures came out pretty well!


I will say that the quality of the prints is directly equal to the quality of the photo itself.  In my Groovebook I had a combination of pictures from my Android phone, personal digital camera as well as high resolution pictures from a professional photographer. (You do have to upload pictures to your phone that are not take by your phones camera before you can upload them to the groove book app) The professional photos looked the best and the others reflected the quality of the pictures themselves. Depending on the size of the image, some of them had white borders as well. For my purposes however, no biggie! I scrapbook and I crop my pictures anyways, so it did not bother me a bit. The photo paper they are printed on is similar to photo paper I have seen for ink jet printers. Its thinner than photo paper from Costco or other photo printing services.  I would probably still go through another photo printing service if i needed a large print or a thicker individual print for some reason, but for scrapbooking or "brag books" Groovebook suits my need just fine!

I am just so pleased with this service and can't wait to get my next books! Your subscription gets you one Groovebook per month (for the $2.99) and charges once you close your book, or on your renewal date.  You can also order additional books for an additional $2.99 each, and can even have them sent to other friends or family members. (How great for sending out vacation or family photos to grandparents etc!) I just love that my photos can be all in one contained place, ready for scrap booking! I plan to keep ordering from  Groovebook as long as they are still in business!

For those of you who may be wondering about the app itself, I thought I would give you a quick tour. Once you upload the app, you will be asked for your info and credit card you would like to use for your subscription and any coupon codes you may have. Once you have completed that, you will reach the main screen.


To start adding photos to your book, click the "Review" button and you will be able to pick where your pictures are pulled from on your phone. Once you have uploaded photos, you can click on the photos you would like to add to your book. Once you have selected the photos you want, come back to this screen and click the "Upload" button. If you go back to the "Review" screen now, it will show you which photos you have uploaded like this.


Any pictures that you do not choose for your Groovebook will look like this.


Your pictures will remain in the file even after they have been officially printed in a Groovebook. Photos that have already been printed in a previous Groovebook will have little yellow dots in them like this.


You can always reselect any of those pictures to print in future Groovebooks as well. From the main screen, if you click the green "Information" button at the bottom of the screen, a screen of options will come up like this.


From here, you can do any number of things from editing your account info, checking your order history etc. If you click "Advanced photo selection" you get this screen, where you can change the quantity of each selected photo that you would like in your book.


As I mentioned before, you can use any number of pictures, 40 and above, and just increase the quantity to equal a total of 100 prints. The company is relatively new, and the app could use some updating (thus the reason for my quickie tutorial) but it gets the job done and I am sure with Shutterfly purchasing them, improvements and other exciting things are on the way! The shipping was pretty timely as well. If you click on the "Order history" button you can see your previous orders.


As you can see, my last book was ordered January 28. It shipped February 2nd and it arrived to me about 3 days ago. Again, not bad at all for three bucks! AND, best of all, they sent me extra prints at the end of my book with coupon codes for me to share!! SO.....all of my readers can try Groovebook for FREE!!!! If you use my coupon code, you can get your very first Groovebook free! Now, I get NO bonus or anything for you guys trying Groovebook. I really do just love it and hope that you will too! Happy Groovebook-ing!!


Friday, February 13, 2015

The Map

About a year ago, I made my first International sale on my Etsy shop.  The Fiance suggested that it would be super cool to have a map where I could mark places where I have made sales.  I though it was such an awesome idea! Now, for those of you who don't have your own Etsy shop, I will tell you that Etsy for sellers is very helpful and has a map of the world where you can see where people view and favorite your shop.  This is a great feature and helps gauge where interest in your items and shop come from.  However, for me, it lacks that element of satisfaction that comes from pushing a pin into a map every time I get a new sale! I mean seriously, how awesome and motivating is that?

I decided to start my motivational map smaller, since I don't make many international sales, and start off with just  U.S. map.  My future sister in law gave me a spoonflower gift card for Christmas. (AWESOME!!)  I decided to put it to good use and purchase some fabrics I had had my eye on.  I ordered some fabric to cover the cork boards for my "Inspiration Wall" as well as a fat quarter with a brightly colored map of the United States on it.

I had a nice frame from an old wall hanging.  I popped the glass out of it and, not wanting to be wasteful, decided to "recycle" the cork board I used for my inspiration boards at my old house. I used the cardboard insert from my new frame to measure out the area I would need to cut out on the old cork board.


I then used a box cutter to cut out my newly measure cork board shape.


Next, I ironed and starched my fabric map to ensure that no wrinkles stayed behind.


I then lay the map, image side down on my table. I centered my cork board cut out, cork side down, on top of the fabric map.  I trimmed the excess fabric around the cork board leaving approximately 1 inch peeking out on all 4 sides.


After that, I anchored down my hanging fabric edges to the back side of the cork board using a hot glue gun. Watch those fingers people! I burnt myself a time or two on this one.


Each time I moved to the next side, I made sure to pull slightly on my fabric to ensure that it remained tight and would not sag in the middle once completed.


Once all 4 sides were secure, and the hot glue had cooled, I dropped my new cork board into the frame and secured the back.


I then used some heavy duty command strips to hang this baby onto the wall of my new sewing room.


 Next item of business was to find some map pins.  I had no idea these would be so hard to find! I wanted shorter pins and I wanted them all in one color.  I could not, however, find map pins in any store in any color, much less all in the same color. Sigh! So, I went to the one place left I could think of.....Amazon! No, but seriously, if it doesn't exist there, it just plain doesn't exist! OK, maybe it only feels that way. None the less, they not only had map pins, they had them in every imaginable color! I wanted a color that would pop, but would also look nice with the map colors.  I finally settled on orange, the Etsy color! Fitting right? Plus, look how awesome it looks with all of my sales pinned!


Its definitely off to a great start! I realized, as I was placing my pins in position, that this map is missing both Alaska AND Hawaii!!! I got a little sad. So, as you can see, there is one pin floating just south of Arizona. This represents my Hawaii sale until I can add in actual Hawaii and Alaska. (Yes, I  realize Hawaii is no where near south of Arizona) None the less, I can't wait to keep adding pins as I reach further goals in my shop. Maybe someday I will get to expand into a full world map! Who wants to be my next pin? Happy Shopping everyone!

Friday, February 6, 2015

Sewing room reveal

Its finally here! Between wedding planning, other home projects and life in general, I have finally managed to (mostly) complete the organization and layout of my sewing room!


There are still some minor things left to do, (we still need to put the doors back on the fabric hutch) but it is fully functional now and I can get back to sewing and coming up with new products for the shop.  So, without further ado, let me take you on a quick tour.

When you first walk in and turn to your right, there is a small bookshelf that holds my Tinker Bell nick knacks as well as some of my cook book and sewing books.


A few months back, I found these hanging wire baskets that I decided to hang here on the wall.  There is one for "magazines", "mail" and "stuff".


This is a quick way for me to keep important papers separate from my sewing stuff, and also an official place for The Fiance to put any mail that comes for me so it doesn't get lost.

Right next to that is my fabric hutch. (which The Fiance and I re-finished together)


Clearly, as I have said, the doors need to be put back on, and yes, I still need to finish the last 3 of my pattern storage boxes. All of this fabric has been calling my name for months and is just itching to made into something fantastic! I cannot wait to get started!

Next to the fabric hutch is my new Ikea shelving unit.  Its perfect for the TV/DVD player The Fiance gave me.  I like to have something on in the background while I sew.  Now, I am all set for watching FRIENDS or LOST or whatever other nerdy show I decide to re watch my way through. I liked this particular shelving unit because, rather than just a stand for the TV, it had shelves for extra storage, but still did not take up too much space.  I hit up an awesome sale at Michael's last week and got these super cute storage boxes. (currently holding wedding stuff)


Next up is my actual sewing table.  Its the same one from my old house.  Along with my beautiful sewing print hanging above.


I always think of FRIENDS when I look at it. (Any fellow FRIENDS nerds recognize this print? $5 discount coupon to my Etsy shop, for the first person to comment with the correct location where this print can be found on the show- GO!)

Next to that is my Ikea chair, or currently the storage place for my hand made star wars rag quilt and some freshly washed flannel that needs to be ironed. Any volunteers?


Right above that is a new addition to my sewing space.  A United States map! Stay tuned next week for further explanation.  Continuing on is my bookshelf. Pretty self explanatory I think.


Next to that is another new feature I added to my sewing space which I absolutely LOVE! My old "inspiration board" wasn't really working for the space I had.  On a trip to Michael's for some other crafting supplies, I was struck with an idea for a new, combo, inspiration/functional space. Michael's had 12x12 metal pegboards on sale.  I decided to combine these with 12x12 cork board squares, covered in fabric, to create an area that is decorative as well as useful. I just love how it turned out!


It also sits nicely above the fold out cutting table that was made for me by my good friend. Check out her creative adventures HERE.

The closet space is very much the same as my old closet space, with cubes for "project bins" to keep in progress projects from cluttering up my space. There is also plenty of space for my storage bins for keeping finished Etsy projects in prior to being sold. This is also where I keep more crafting supplies and scrapbooking items.


And of course, last but not least, no space of mine would be complete without this beauty inside the door.


The happy memories it brings of FRIENDS, both fictional and real, helps inspire me and my space as a place for fun a creativity. MY friends always inspire me to do my best and keep on creating! I love my new space and can't wait to get started on many new projects.


Saturday, January 3, 2015

New Year, New adventures!

Happy New Year! I hope you all had a wonderful Holiday season! To begin with, in case anyone was wondering, Yes, I am still alive! Haha....My sudden (and rather lengthy,even for me) absence was due to a plethora of excitement and generally a higher than normal level of busyness. I had full plans to blog about my new DIY Christmas ornament ideas through the month of November.  Obviously that did not happen. I also had plans to blog about the new DIY wreath I was going to make out of mini ornaments. I bought the supplies but also, did not make it. Sigh, sigh, sigh! That being said, despite my total lack of blog and crafting productivity, I have at least been highly productive outside of that.

My lease expired at the end of November and so we began the process of moving my things to the new house! Yay! We were pretty happy that we had both spaces at once, since it allowed us to move things gradually rather than a rushed moving day.  So, obviously with the holidays, the process of unpacking has been slightly stalled. (Insert plenty of family get togethers, long work hours, eating way too much yummy food!) We are making progress though, slowly but surely. Here, as you will remember, is my freshly painted sewing room, pre-move in.


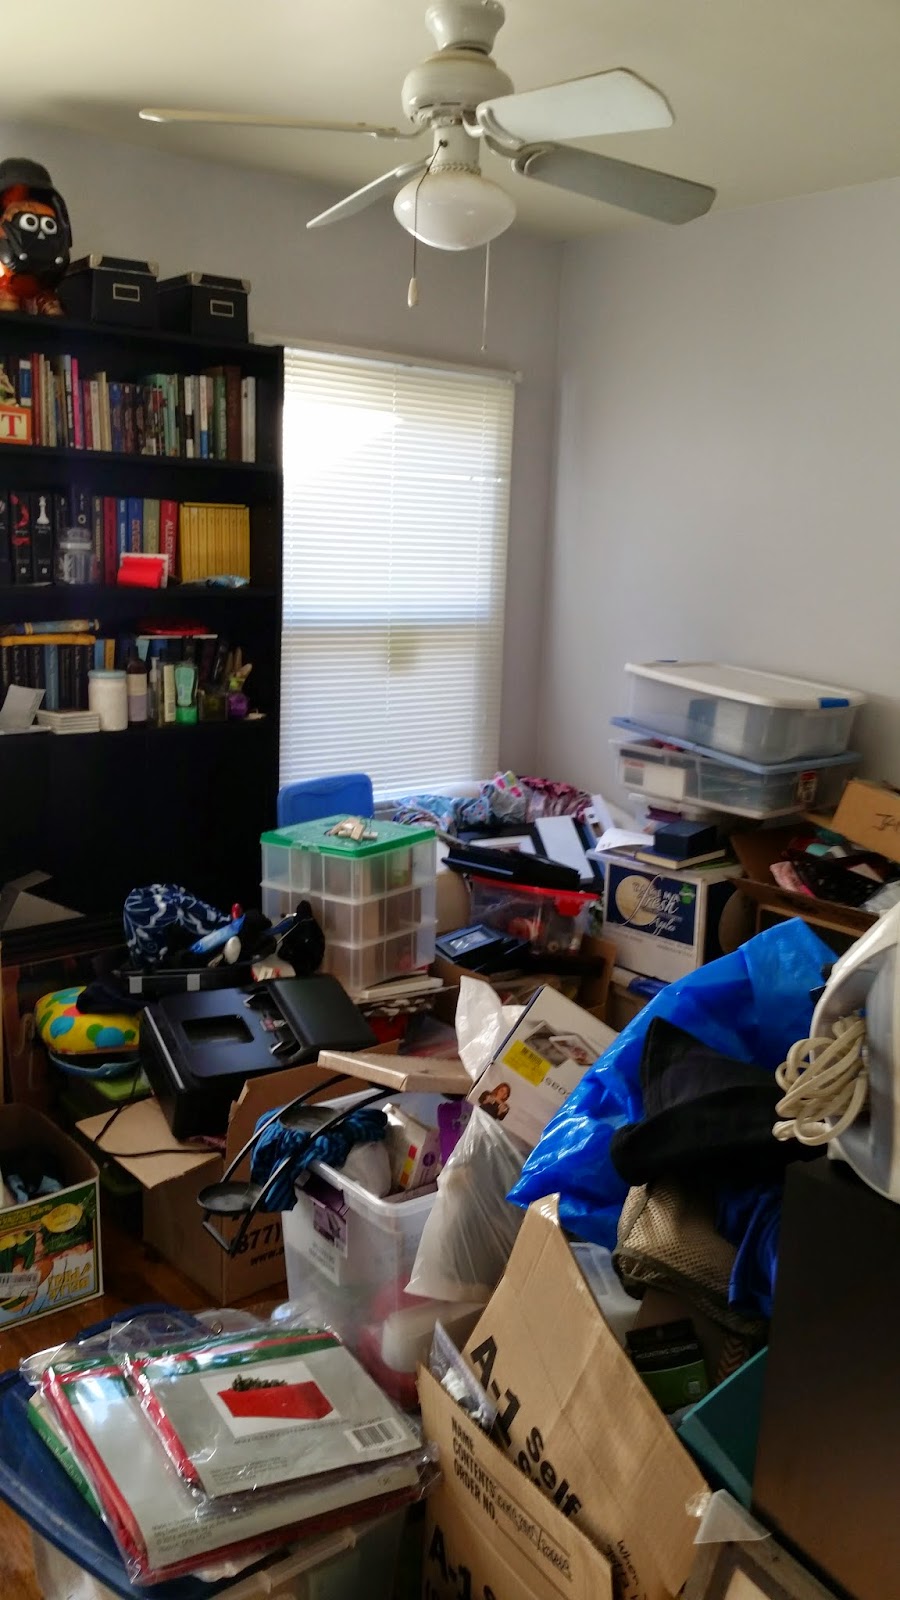
And here it is as it stands now....


OK, I PROMISE I am NOT a hoarder! Haha! Oh goodness I am so embarrassed! I am making more progress every day in here little by little. I'm REALLY REALLY hoping to finish it in the next week or so. I'm having some serious sewing withdrawals!

For the most part, the rest of the house is really coming along! Its super fun figuring out where things go and adding our own little touches to make the place our own.  Here was the freshly painted living room, void of furniture.


And here it is all decorated for Christmas! (Yes, we were glued to the Myth Busters mega-marathon)


It was so nice having all of the Christmas stuff out! The Fiance even hung lights!


Even though I had to work most of the holidays, we squeezed in a lot of fun with family and friends.  We even made time to celebrate our 3 year anniversary in early December!


We also celebrated The Fiance's birthday later in December! (you can see his birthday present in the living room picture...I got him a little fireplace potbelly stove! He fell in love with it at the Home Depot during our many visits during house reno)

Whew, we had a lot going on to wrap up the year! We are very much looking forward to our wedding later this year and are enjoying planning our special day. I hope you all had a fantastic holiday season and I look forward to sharing another year of creative adventures with you!

Monday, March 9, 2015

And the Oscar goes to....

Several years ago, my sister and her husband started holding annual Oscar parties.  We were a family of theatre kids and always watched the Oscars growing up. At least as often as we could convince my parents to let us stay up late to do so.  We hardly ever saw any of the movies nominated, but we would watch it!  Since this is the first year The Fiance and I have our own place, I decided (rather last minute) to throw our very first Oscar party!


The Fiance, who is well aware of just how big of a nerd I am, was sort of laughing at me and asking what happens at an Oscar party?  He, apparently, has NEVER watched The Oscars!?! Since my sister is the resident expert, I called her for some tips. She sent me a link for this years winner's ballot as well as a super cool Oscar Bingo!


For those who are generally not interested in The Oscars, might I just say, its a a LOT more fun when you are playing Bingo and get to block out a space when a celebrity trips or cries!

I provided dinner for my guests and asked them each to bring their favorite movie snack to share. I decided to make "popcorn cupcakes" to share! I made a batch of vanilla cupcakes and let them cool.  I found a template for popcorn cupcake wrappers and printed and cut them out.


I taped one wrapper around each cooled cupcake and lightly frosted the top of each one using vanilla frosting.  I then took mini marshmallows and cut each one in half.  Then squished the two halves together to form abnormal-popcorn shapes. Once I had enough, I covered the tops of the cupcakes with the "popcorn-marshmallows".  And of course, no popcorn is complete with out the butter!! I put 2 drops of yellow food coloring into a bowl and mixed it with a spoon full of water.  With a clean q-tip, I dabbed the "butter" onto the marshmallows and.....tah dah!!!  POPCORN CUPCAKES!


I printed out enough official ballots and bingo boards for my guests.  I ordered official bingo daubers from Amazon in a plethora of colors.  I found a template for little Oscar statues to use for decorations.


I traced several onto black and gold paper , assembled them and placed them around the room. Now, it was feeling very "Oscar-ey"!!


For the final touch, I prepped prizes for the winners.  My sister advised that it was best to have a first and second prize winner for bingo to keep the game going throughout the awards ceremony.  For fist prize, I hit up my local 99cent store and assembled a "movie night" basket, complete with popcorn, sodas, candy and a Redbox movie code.


For second prize, I printed  out an "Oscar winner" card and put two Redbox code on the back. (The Fiance won second place, by the way. I guess Oscar Bingo isn't too nerdy for him after all haha.)

For the Oscar winner ballots, I had each of my guests place their votes for the winners before the ceremony started and we graded them as we went.  My sister has an "Oscar statue" that she made out of an old Nutcracker that she found at a thrift store and spray painted gold.  Every year, the previous years winner brings back the trophy and it goes home with that year's winner, Stanley Cup style.  I decided we needed our own trophy.  I was running behind and did not have time to search for a nutcracker of my own, so I improvised! I had a round plastic box that I decided to use for the base.


I filled it partly with some hot glue for added weight and stability. Then, I sealed the lid on.


In my search for an Oscar look alike, I came across a box of PEZ dispensers at the impulse-buy section at JoAnn. Who better than Kermit the Frog to emulate the infamous Oscar??


I secure him to the circular base and gave the entire statue a coating of gold spray paint. How cute is this??


My best friend's husband won the ballot contest by a landslide! Here is his awesomely theatrical award acceptance photo shoot!


Everyone had a great time! Especially the debate over whether or not a diet coke commercial counted as a "coke commercial" for the bingo game! Seriously, HUGE and lengthy debate!! LOL I am looking forward to carrying on the tradition and seeing who gets to take "Kerm-Oscar" home next year!

Monday, February 16, 2015

Get in the groove

DISCLAIMER: This is not a sponsored post and all opinions expressed are 100% my own.

I would like to cordially invite you all to get in the groove: Groove book that is! Once in a while, a product comes along that is just too awesome NOT to share! A friend of mine recently told me about the photo app Groove book. For any of you who have not heard of it, it was recently featured on the TV show Shark Tank and was also just purchased by Shutterfly. Basically, its a subscription service and fantastic way to print out copies of your photos. The app itself is free to download for IPhone as well as Android phones.  For $2.99 a month, (plus tax: equals out to a little over $3-shipping included) you upload 100 pictures (or 40 pictures with multiple copies of each, adding up to 100) and they send you printed copies of your pictures in a bound 4x6 booklet! Each photo is perforated at the edge so that you can tear them out, or leave them in the adorable little booklet for sharing. 

I was skeptical at first when a friend of mine told me about this app. $3 for 100 printed pictures?? How good is the quality of the prints, I wondered. So, I started reading around on some reviews. Several people commented that the quality of the images was poor. Others, could not stop raving about how awesome this service was. So, I decided to go for it! You can cancel your subscription any time. So, I figured that for three bucks, I could chance it and see how it goes. I downloaded the app and started uploading pictures right away. I placed my first order the very next day. My very first Groovebook arrived just the other day. First of all, how stinking cute is this??


I was already impressed by its adorable-ness! I opened it up and continued to be blown away! The pictures came out pretty well!


I will say that the quality of the prints is directly equal to the quality of the photo itself.  In my Groovebook I had a combination of pictures from my Android phone, personal digital camera as well as high resolution pictures from a professional photographer. (You do have to upload pictures to your phone that are not take by your phones camera before you can upload them to the groove book app) The professional photos looked the best and the others reflected the quality of the pictures themselves. Depending on the size of the image, some of them had white borders as well. For my purposes however, no biggie! I scrapbook and I crop my pictures anyways, so it did not bother me a bit. The photo paper they are printed on is similar to photo paper I have seen for ink jet printers. Its thinner than photo paper from Costco or other photo printing services.  I would probably still go through another photo printing service if i needed a large print or a thicker individual print for some reason, but for scrapbooking or "brag books" Groovebook suits my need just fine!

I am just so pleased with this service and can't wait to get my next books! Your subscription gets you one Groovebook per month (for the $2.99) and charges once you close your book, or on your renewal date.  You can also order additional books for an additional $2.99 each, and can even have them sent to other friends or family members. (How great for sending out vacation or family photos to grandparents etc!) I just love that my photos can be all in one contained place, ready for scrap booking! I plan to keep ordering from  Groovebook as long as they are still in business!

For those of you who may be wondering about the app itself, I thought I would give you a quick tour. Once you upload the app, you will be asked for your info and credit card you would like to use for your subscription and any coupon codes you may have. Once you have completed that, you will reach the main screen.


To start adding photos to your book, click the "Review" button and you will be able to pick where your pictures are pulled from on your phone. Once you have uploaded photos, you can click on the photos you would like to add to your book. Once you have selected the photos you want, come back to this screen and click the "Upload" button. If you go back to the "Review" screen now, it will show you which photos you have uploaded like this.


Any pictures that you do not choose for your Groovebook will look like this.


Your pictures will remain in the file even after they have been officially printed in a Groovebook. Photos that have already been printed in a previous Groovebook will have little yellow dots in them like this.


You can always reselect any of those pictures to print in future Groovebooks as well. From the main screen, if you click the green "Information" button at the bottom of the screen, a screen of options will come up like this.


From here, you can do any number of things from editing your account info, checking your order history etc. If you click "Advanced photo selection" you get this screen, where you can change the quantity of each selected photo that you would like in your book.


As I mentioned before, you can use any number of pictures, 40 and above, and just increase the quantity to equal a total of 100 prints. The company is relatively new, and the app could use some updating (thus the reason for my quickie tutorial) but it gets the job done and I am sure with Shutterfly purchasing them, improvements and other exciting things are on the way! The shipping was pretty timely as well. If you click on the "Order history" button you can see your previous orders.


As you can see, my last book was ordered January 28. It shipped February 2nd and it arrived to me about 3 days ago. Again, not bad at all for three bucks! AND, best of all, they sent me extra prints at the end of my book with coupon codes for me to share!! SO.....all of my readers can try Groovebook for FREE!!!! If you use my coupon code, you can get your very first Groovebook free! Now, I get NO bonus or anything for you guys trying Groovebook. I really do just love it and hope that you will too! Happy Groovebook-ing!!


Friday, February 13, 2015

The Map

About a year ago, I made my first International sale on my Etsy shop.  The Fiance suggested that it would be super cool to have a map where I could mark places where I have made sales.  I though it was such an awesome idea! Now, for those of you who don't have your own Etsy shop, I will tell you that Etsy for sellers is very helpful and has a map of the world where you can see where people view and favorite your shop.  This is a great feature and helps gauge where interest in your items and shop come from.  However, for me, it lacks that element of satisfaction that comes from pushing a pin into a map every time I get a new sale! I mean seriously, how awesome and motivating is that?

I decided to start my motivational map smaller, since I don't make many international sales, and start off with just  U.S. map.  My future sister in law gave me a spoonflower gift card for Christmas. (AWESOME!!)  I decided to put it to good use and purchase some fabrics I had had my eye on.  I ordered some fabric to cover the cork boards for my "Inspiration Wall" as well as a fat quarter with a brightly colored map of the United States on it.

I had a nice frame from an old wall hanging.  I popped the glass out of it and, not wanting to be wasteful, decided to "recycle" the cork board I used for my inspiration boards at my old house. I used the cardboard insert from my new frame to measure out the area I would need to cut out on the old cork board.


I then used a box cutter to cut out my newly measure cork board shape.


Next, I ironed and starched my fabric map to ensure that no wrinkles stayed behind.


I then lay the map, image side down on my table. I centered my cork board cut out, cork side down, on top of the fabric map.  I trimmed the excess fabric around the cork board leaving approximately 1 inch peeking out on all 4 sides.


After that, I anchored down my hanging fabric edges to the back side of the cork board using a hot glue gun. Watch those fingers people! I burnt myself a time or two on this one.


Each time I moved to the next side, I made sure to pull slightly on my fabric to ensure that it remained tight and would not sag in the middle once completed.


Once all 4 sides were secure, and the hot glue had cooled, I dropped my new cork board into the frame and secured the back.


I then used some heavy duty command strips to hang this baby onto the wall of my new sewing room.


 Next item of business was to find some map pins.  I had no idea these would be so hard to find! I wanted shorter pins and I wanted them all in one color.  I could not, however, find map pins in any store in any color, much less all in the same color. Sigh! So, I went to the one place left I could think of.....Amazon! No, but seriously, if it doesn't exist there, it just plain doesn't exist! OK, maybe it only feels that way. None the less, they not only had map pins, they had them in every imaginable color! I wanted a color that would pop, but would also look nice with the map colors.  I finally settled on orange, the Etsy color! Fitting right? Plus, look how awesome it looks with all of my sales pinned!


Its definitely off to a great start! I realized, as I was placing my pins in position, that this map is missing both Alaska AND Hawaii!!! I got a little sad. So, as you can see, there is one pin floating just south of Arizona. This represents my Hawaii sale until I can add in actual Hawaii and Alaska. (Yes, I  realize Hawaii is no where near south of Arizona) None the less, I can't wait to keep adding pins as I reach further goals in my shop. Maybe someday I will get to expand into a full world map! Who wants to be my next pin? Happy Shopping everyone!

Friday, February 6, 2015

Sewing room reveal

Its finally here! Between wedding planning, other home projects and life in general, I have finally managed to (mostly) complete the organization and layout of my sewing room!


There are still some minor things left to do, (we still need to put the doors back on the fabric hutch) but it is fully functional now and I can get back to sewing and coming up with new products for the shop.  So, without further ado, let me take you on a quick tour.

When you first walk in and turn to your right, there is a small bookshelf that holds my Tinker Bell nick knacks as well as some of my cook book and sewing books.


A few months back, I found these hanging wire baskets that I decided to hang here on the wall.  There is one for "magazines", "mail" and "stuff".


This is a quick way for me to keep important papers separate from my sewing stuff, and also an official place for The Fiance to put any mail that comes for me so it doesn't get lost.

Right next to that is my fabric hutch. (which The Fiance and I re-finished together)


Clearly, as I have said, the doors need to be put back on, and yes, I still need to finish the last 3 of my pattern storage boxes. All of this fabric has been calling my name for months and is just itching to made into something fantastic! I cannot wait to get started!

Next to the fabric hutch is my new Ikea shelving unit.  Its perfect for the TV/DVD player The Fiance gave me.  I like to have something on in the background while I sew.  Now, I am all set for watching FRIENDS or LOST or whatever other nerdy show I decide to re watch my way through. I liked this particular shelving unit because, rather than just a stand for the TV, it had shelves for extra storage, but still did not take up too much space.  I hit up an awesome sale at Michael's last week and got these super cute storage boxes. (currently holding wedding stuff)


Next up is my actual sewing table.  Its the same one from my old house.  Along with my beautiful sewing print hanging above.


I always think of FRIENDS when I look at it. (Any fellow FRIENDS nerds recognize this print? $5 discount coupon to my Etsy shop, for the first person to comment with the correct location where this print can be found on the show- GO!)

Next to that is my Ikea chair, or currently the storage place for my hand made star wars rag quilt and some freshly washed flannel that needs to be ironed. Any volunteers?


Right above that is a new addition to my sewing space.  A United States map! Stay tuned next week for further explanation.  Continuing on is my bookshelf. Pretty self explanatory I think.


Next to that is another new feature I added to my sewing space which I absolutely LOVE! My old "inspiration board" wasn't really working for the space I had.  On a trip to Michael's for some other crafting supplies, I was struck with an idea for a new, combo, inspiration/functional space. Michael's had 12x12 metal pegboards on sale.  I decided to combine these with 12x12 cork board squares, covered in fabric, to create an area that is decorative as well as useful. I just love how it turned out!


It also sits nicely above the fold out cutting table that was made for me by my good friend. Check out her creative adventures HERE.

The closet space is very much the same as my old closet space, with cubes for "project bins" to keep in progress projects from cluttering up my space. There is also plenty of space for my storage bins for keeping finished Etsy projects in prior to being sold. This is also where I keep more crafting supplies and scrapbooking items.


And of course, last but not least, no space of mine would be complete without this beauty inside the door.


The happy memories it brings of FRIENDS, both fictional and real, helps inspire me and my space as a place for fun a creativity. MY friends always inspire me to do my best and keep on creating! I love my new space and can't wait to get started on many new projects.


Saturday, January 3, 2015

New Year, New adventures!

Happy New Year! I hope you all had a wonderful Holiday season! To begin with, in case anyone was wondering, Yes, I am still alive! Haha....My sudden (and rather lengthy,even for me) absence was due to a plethora of excitement and generally a higher than normal level of busyness. I had full plans to blog about my new DIY Christmas ornament ideas through the month of November.  Obviously that did not happen. I also had plans to blog about the new DIY wreath I was going to make out of mini ornaments. I bought the supplies but also, did not make it. Sigh, sigh, sigh! That being said, despite my total lack of blog and crafting productivity, I have at least been highly productive outside of that.

My lease expired at the end of November and so we began the process of moving my things to the new house! Yay! We were pretty happy that we had both spaces at once, since it allowed us to move things gradually rather than a rushed moving day.  So, obviously with the holidays, the process of unpacking has been slightly stalled. (Insert plenty of family get togethers, long work hours, eating way too much yummy food!) We are making progress though, slowly but surely. Here, as you will remember, is my freshly painted sewing room, pre-move in.


And here it is as it stands now....


OK, I PROMISE I am NOT a hoarder! Haha! Oh goodness I am so embarrassed! I am making more progress every day in here little by little. I'm REALLY REALLY hoping to finish it in the next week or so. I'm having some serious sewing withdrawals!

For the most part, the rest of the house is really coming along! Its super fun figuring out where things go and adding our own little touches to make the place our own.  Here was the freshly painted living room, void of furniture.


And here it is all decorated for Christmas! (Yes, we were glued to the Myth Busters mega-marathon)


It was so nice having all of the Christmas stuff out! The Fiance even hung lights!


Even though I had to work most of the holidays, we squeezed in a lot of fun with family and friends.  We even made time to celebrate our 3 year anniversary in early December!


We also celebrated The Fiance's birthday later in December! (you can see his birthday present in the living room picture...I got him a little fireplace potbelly stove! He fell in love with it at the Home Depot during our many visits during house reno)

Whew, we had a lot going on to wrap up the year! We are very much looking forward to our wedding later this year and are enjoying planning our special day. I hope you all had a fantastic holiday season and I look forward to sharing another year of creative adventures with you!