Friday, January 3, 2014

2013-Gone in a snap!

Time flies when you're having fun and 2013 has been no exception for me.  This year has breezed right by and it has certainly been a year chalked full of memories and new adventures for me.  This year, I officially opened my very own Etsy shop.  It has been so much fun bringing my bags to life and working with my customers to create unique pieces they will love.  The joy I have found in my Etsy shop has led me to further explore my creative side with the creation of this blog.  Its only been a couple of months now, but it is such excellent motivation to actually push my way through my project list and finding new creative ventures. It has been a pleasure sharing my adventures and wanderings with you all and I look forward to many years to come. 

This New Years' day was sort of my "holiday recuperation day" as I like to call it.  The holidays always feel busy but this particular year seemed extremely busy and stressful for me.  Beings that I actually found myself off of work this year for the holiday, I decided to just relax! Not, however, wanting to be a complete loaf, (Although to be honest I did spend the entire day in pajamas and most of the day on the couch.)I found myself a quick project that I could actually do from the comforts of my living room and allow myself a small sense of accomplishment for the day.  For some time now I have been putting off this project and I'm not sure if I was feeling somewhat New years resolution-ey or what, but I decided it had been put procrastinated enough.

Some time ago (months at least) the zipper on my favorite duvet cover had broken.  I thought it a terrible waste to throw away something I loved so much and that was still perfectly functional in every other aspect.  I decided that I would fix it myself.  I had no idea where one might get a 60 inch zipper and even if I did, zippers are not my favorite thing to work with in general, much less trying to replace a zipper into an already sewn item. I weighed the other options including sewing on ribbon ties, or adding buttons and button holes (YUCK! Such a hassle!) and eventually decided I would just add snaps! So, New Years morning, I removed my comforter from its cover and dragged the duvet into the living room.  While watching the replay of the Rose Parade, (There was no way I was getting up in time to watch the original airing) I took my seam ripper and carefully removed the broken zipper.
 
 
Once the zipper was out, it was time to add the snaps.  I grabbed a plank of wood and laid it on my living room floor to provide a stable, solid surface.  I placed a folded up towel on top of that to help muffle the hammering I was about to do, and in an effort to not upset my downstairs neighbors.  I had grabbed a couple packages of metal snaps from JoAnn a while back.  The snaps I use are a 4 part snap, two pieces come together for each side of the snap.


Each side has a piece with "claws" which you position on the outside of whatever fabric item you are attaching it to, and then either a male or female piece goes on the inside of the fabric on top of the claws and the are carefully hammered together.  The hammering causes the "claws" to bend up and inside of the non-clawed end and fastens the pieces together. I recommend purchasing the "snap assembly tool" they make as well. (Also available at JoAnn)


The snap instructions say that you can use a spook of thread, which I have also done in the past, but I find that the tool makes for a bit more accuracy and less chance of missing your target and messing up a few snaps before you get it right.


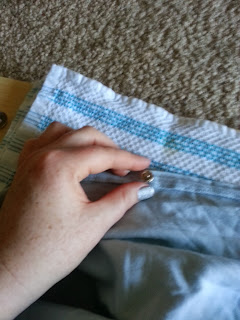
I wanted my snaps to be relatively uniformly spaced, so I started out placing one on each end and one in the very middle of my space and then just kept placing snaps in the center of those gaps until I was happy with the number of snaps I had and a proper space was left between the snaps.  I also did all of the male snap sides along one half of my opening first and then one at a time lined up the other side and placed a female snap half aligned with the male half on the opposite side. That way I ensured that each snap had a corresponding male and female half at the appropriate place on the strip of fabric. I chose snaps with a white outer surface as well so that they would be less noticeable on the finished product.

 
(PLEASE ignore my wrinkles! I had not yet let Downey wrinkle releaser work its magic on this baby! haha)  All in all it was a really simple and straightforward project.  In fact, I'm really not sure why I put it off for so long.


For any of you out there admiring my lovely bed, stay tuned! Someday soon I will share with you the story of a great friend and creative counterpart and how we built me a bed! That's right, we made that bed with our own hands! :)
 
Happy New Year everyone! May this year bring you many smiles and beautiful moments and memories shared with friends, family and loved ones!

2 comments:

  1. Oh my gosh! That looks like the most comfy bed in the world!

    ReplyDelete
    Replies
    1. It is pretty comfy, I'm not gonna lie. Sometimes I want to lay cuddled up in my warm blankets all day! :)

      Delete

Friday, January 3, 2014

2013-Gone in a snap!

Time flies when you're having fun and 2013 has been no exception for me.  This year has breezed right by and it has certainly been a year chalked full of memories and new adventures for me.  This year, I officially opened my very own Etsy shop.  It has been so much fun bringing my bags to life and working with my customers to create unique pieces they will love.  The joy I have found in my Etsy shop has led me to further explore my creative side with the creation of this blog.  Its only been a couple of months now, but it is such excellent motivation to actually push my way through my project list and finding new creative ventures. It has been a pleasure sharing my adventures and wanderings with you all and I look forward to many years to come. 

This New Years' day was sort of my "holiday recuperation day" as I like to call it.  The holidays always feel busy but this particular year seemed extremely busy and stressful for me.  Beings that I actually found myself off of work this year for the holiday, I decided to just relax! Not, however, wanting to be a complete loaf, (Although to be honest I did spend the entire day in pajamas and most of the day on the couch.)I found myself a quick project that I could actually do from the comforts of my living room and allow myself a small sense of accomplishment for the day.  For some time now I have been putting off this project and I'm not sure if I was feeling somewhat New years resolution-ey or what, but I decided it had been put procrastinated enough.

Some time ago (months at least) the zipper on my favorite duvet cover had broken.  I thought it a terrible waste to throw away something I loved so much and that was still perfectly functional in every other aspect.  I decided that I would fix it myself.  I had no idea where one might get a 60 inch zipper and even if I did, zippers are not my favorite thing to work with in general, much less trying to replace a zipper into an already sewn item. I weighed the other options including sewing on ribbon ties, or adding buttons and button holes (YUCK! Such a hassle!) and eventually decided I would just add snaps! So, New Years morning, I removed my comforter from its cover and dragged the duvet into the living room.  While watching the replay of the Rose Parade, (There was no way I was getting up in time to watch the original airing) I took my seam ripper and carefully removed the broken zipper.
 
 
Once the zipper was out, it was time to add the snaps.  I grabbed a plank of wood and laid it on my living room floor to provide a stable, solid surface.  I placed a folded up towel on top of that to help muffle the hammering I was about to do, and in an effort to not upset my downstairs neighbors.  I had grabbed a couple packages of metal snaps from JoAnn a while back.  The snaps I use are a 4 part snap, two pieces come together for each side of the snap.


Each side has a piece with "claws" which you position on the outside of whatever fabric item you are attaching it to, and then either a male or female piece goes on the inside of the fabric on top of the claws and the are carefully hammered together.  The hammering causes the "claws" to bend up and inside of the non-clawed end and fastens the pieces together. I recommend purchasing the "snap assembly tool" they make as well. (Also available at JoAnn)


The snap instructions say that you can use a spook of thread, which I have also done in the past, but I find that the tool makes for a bit more accuracy and less chance of missing your target and messing up a few snaps before you get it right.


I wanted my snaps to be relatively uniformly spaced, so I started out placing one on each end and one in the very middle of my space and then just kept placing snaps in the center of those gaps until I was happy with the number of snaps I had and a proper space was left between the snaps.  I also did all of the male snap sides along one half of my opening first and then one at a time lined up the other side and placed a female snap half aligned with the male half on the opposite side. That way I ensured that each snap had a corresponding male and female half at the appropriate place on the strip of fabric. I chose snaps with a white outer surface as well so that they would be less noticeable on the finished product.

 
(PLEASE ignore my wrinkles! I had not yet let Downey wrinkle releaser work its magic on this baby! haha)  All in all it was a really simple and straightforward project.  In fact, I'm really not sure why I put it off for so long.


For any of you out there admiring my lovely bed, stay tuned! Someday soon I will share with you the story of a great friend and creative counterpart and how we built me a bed! That's right, we made that bed with our own hands! :)
 
Happy New Year everyone! May this year bring you many smiles and beautiful moments and memories shared with friends, family and loved ones!

2 comments:

  1. Oh my gosh! That looks like the most comfy bed in the world!

    ReplyDelete
    Replies
    1. It is pretty comfy, I'm not gonna lie. Sometimes I want to lay cuddled up in my warm blankets all day! :)

      Delete